Animate a setting with a lane
A lane makes one setting of an object, a light or the sky rise and fall again and again while a loop plays. Lanes are added in Loop Studio, where each one takes the shape of a repeating wave or of a curve you draw. Playing the loop shows what they do.
The steps use a sphere. Any object in the scene works the same way.
Open Loop Studio
Click LOOP STUDIO at the top left of the window.
The toolbar, the column of object buttons on the left, OBJECTS, the INSPECTOR and the dock along the bottom disappear. The viewport sits beside the PLAYBACK column, and PARAMETERS and AUTOMATION LANES run along the bottom of the window. A frame in the viewport marks the area an export will show.
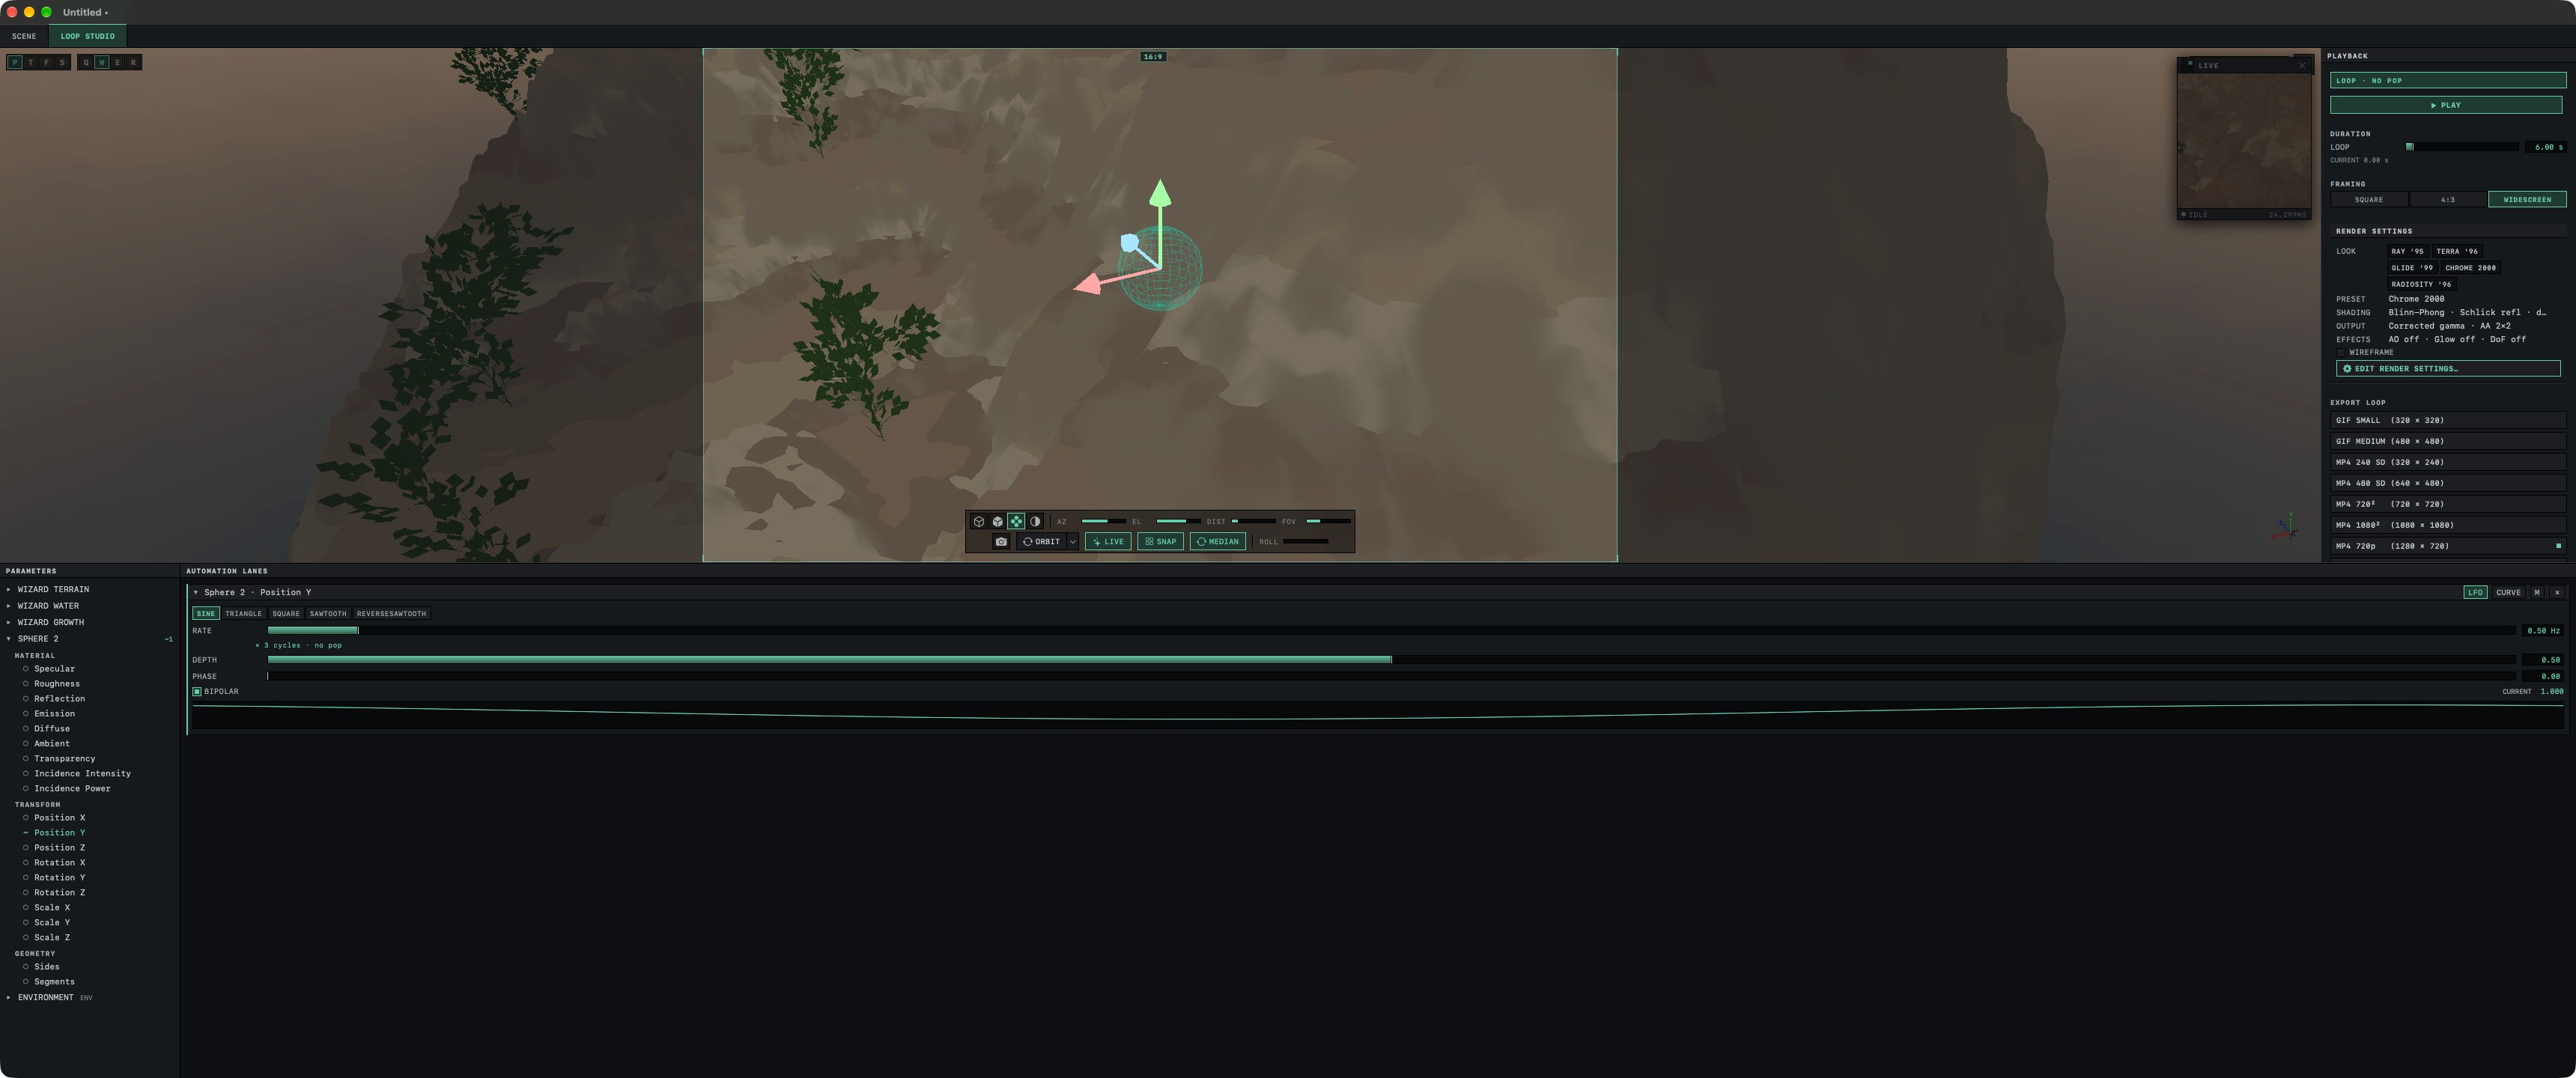
To add or change an object, a material or the sky, click SCENE, make the change and click LOOP STUDIO again. Lanes and loop settings stay as they were. Clicking SCENE during playback stops the loop first.
Add a lane
In PARAMETERS, click the name of the sphere, such as SPHERE 1.
The settings you can animate open below it, grouped under headings such as TRANSFORM and MATERIAL. An empty circle (○) stands beside each one.
Click Position Y.
A lane titled Sphere 1 · Position Y appears under AUTOMATION LANES. The circle beside Position Y changes to ~, and the sphere's row shows ~1, its number of lanes. The lane starts as a SINE wave with a RATE of 0.50 Hz, and its hint reads × 3 cycles · no pop.
Click ▶ PLAY in PLAYBACK.
The sphere rises 2.5 meters above where it stands and sinks as far below, three times in each 6 seconds, and the loop repeats until you stop it.
Click ■ STOP.
The sphere goes back to its position. ■ STOP returns every animated setting to the value it had before you clicked ▶ PLAY.
Each setting takes one lane. Clicking a setting that already has a lane removes that lane.
What a lane can animate
PARAMETERS lists the objects first, then the lights, marked LIGHT, then ENVIRONMENT, which holds the sun, sky, fog and clouds of the scene. An object shows only the headings that apply to it.
| Heading | Settings |
|---|---|
| DEFORMERS | Each slider of each deformer on the object, such as Twist: Amount |
| MATERIAL | Specular, Roughness, Reflection, Emission, Diffuse, Ambient, Transparency, Incidence Intensity, Incidence Power |
| TRANSFORM | Position, Rotation and Scale on each of X, Y and Z |
| GEOMETRY | Sides and Segments, on the objects that have them. The lane moves in whole steps. |
| GROWTH | Droop, Twist, Branch Angle, Taper on a plant |
| LIGHT | Intensity |
| ENVIRONMENT | The sun's direction, height and brightness, fog density and height, sky brightness, cloud cover and the cloud color as Cloud Hue, Cloud Saturation and Cloud Lightness |
A WIND tag beside a setting means the scene's wind can also move that part of the scene on its own. A lane on Cloud Coverage, for example, changes how much cloud there is while the wind keeps the clouds drifting.
Each lane stays within a fixed range, set when you add it, such as −5 to 5 meters for Position and 0.1 to 4 for Scale. The ranges are listed in Loop Studio controls, and they cannot be changed.
Some settings cannot be animated. The camera is one; to circle the camera around a scene, use Export a turntable. A light has a lane for its Intensity only, and arrays, the wave settings of water and the mote settings of plants and emitters have none. The cloud color is the only color a lane can change. The wind's direction and strength do not appear in PARAMETERS, for the reason given in Wind and lanes. Changing a plant's DENSITY or GENERATIONS adds and removes whole branches, which would flicker from frame to frame, so these two have no lanes either.
Shape the wave
A new lane is an LFO, a wave that repeats at a steady rate. The controls sit in the lane below its title.
| Control | Effect |
|---|---|
| SINE, TRIANGLE, SQUARE, SAWTOOTH, REVERSESAWTOOTH | The shape of the wave. SINE eases up and down. TRIANGLE goes up and down in straight lines. SQUARE holds high for half of each cycle and low for the other half. SAWTOOTH climbs and then drops back in one step, and REVERSESAWTOOTH falls and then jumps back up. |
| RATE | Cycles per second, from 0.10 to 10 Hz. |
| DEPTH | How far the wave swings, from 0 to 1, as a share of the setting's range. At 0 the setting does not move. |
| PHASE | Where in its cycle the wave starts, from 0 to 1. At 0.50 it starts half a cycle later. |
| BIPOLAR | On, the default, swings the setting both above and below its value. Off, the value becomes the low point and the wave only rises above it. |
The strip under the controls draws one cycle of the wave, and during playback CURRENT shows the value the lane gives the setting at that moment.
The wave swings around the value the setting has when you click ▶ PLAY. Moving the sphere in the SCENE layout moves the whole wave with it. With BIPOLAR off, a light's Intensity lane brightens the light above its set level and never dims it. Two SINE lanes with the same RATE move in step, and setting PHASE to 0.50 on one of them makes it rise while the other falls.
The hint under RATE counts how many cycles fit in the loop. A whole number repeats without a jump. The other cases, including the two sawtooth shapes, are in Make a loop without a jump.
Draw a curve
A curve sets exact values at points across the loop, for a change that should happen once or at a particular moment.
In the lane, click CURVE.
A curve area replaces the wave controls, with a flat line at the value the setting had when you added the lane. The left edge is the start of the loop and the right edge its end. MIN and MAX give the values at the bottom and the top.

Click in the curve area to add a point, then drag the point up or down.
The setting follows straight lines from point to point. A point cannot be dragged past the points on either side of it.
To remove a point, double-click it.
The curve keeps at least two points.
A curve holds the same values wherever the setting stands when you click ▶ PLAY, and it stretches or shrinks with the loop's length. CLEAR returns it to the flat line. LFO switches back to the wave with its earlier settings, and the curve is kept for the next time you click CURVE. A dashed amber line at the right edge means the curve ends at a different value than it starts with, and the loop will jump there.
Lanes that change an object's shape
Lanes on a deformer, Sides or Segments rebuild the object for every frame. When you click ▶ PLAY, Orbit first builds each frame of the loop, and ▶ PREPARING with a percentage and a bar takes the place of ▶ PLAY. The loop starts when the percentage reaches 100. This step has no stop control. To stop the loop, wait until it starts playing and click ■ STOP. A ❄ beside a lane during playback means that object is too heavy to rebuild for the preview, as described in A lane does not change anything; the export still builds every frame.
Mute or delete a lane
Click M in a lane's title row to mute it. A muted lane moves nothing in playback or in an export, and its title turns gray. Click M again to turn it back on.
To delete a lane, click × in its title row, or click the setting's ~ in PARAMETERS. ⌘Z brings the lane back.
Lanes are saved in the scene file with the objects. For the loop as a whole, including the waves, wind and motes that move without a lane, see How loops work.
Next: Make a loop without a jump.