Render and save an image
EXPORT RENDER traces the current camera view at the size you choose, with shadows, reflections and the render look, and saves it as a PNG, JPEG or TIFF file.
The scene needs at least one object. If it holds only lights, RENDER is dimmed.
Render a picture
Move the camera to the view you want in the picture.
The render shows what the camera sees, without the objects you have hidden. To see where the edges of the picture will fall, turn on the frame from Frame the shot.
Click EXPORT RENDER, near the right end of the toolbar.
The EXPORT RENDER sheet opens with the sections SIZE, FORMAT, BACKGROUND and RENDER SETTINGS.
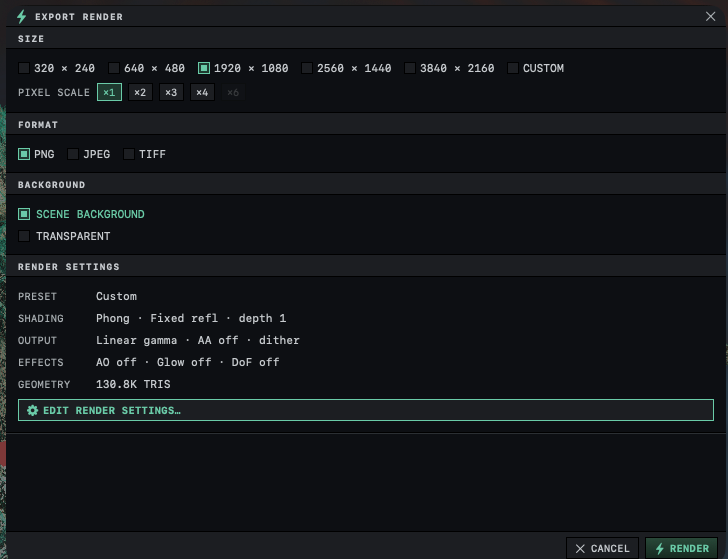
Under SIZE, click a size, and under FORMAT, click a file type.
The sheet starts on 1920 × 1080 and PNG. Orbit remembers your choices the next time you open the sheet.
Click RENDER, or press Return.
BUILDING SCENE… appears while Orbit prepares the scene, then RENDERING with a percentage. The picture fills in tile by tile.
When SAVE IMAGE appears, click it, choose a folder and click Save.
The file name starts as
orbit-render-followed by the date and time, with the extension of the format you chose.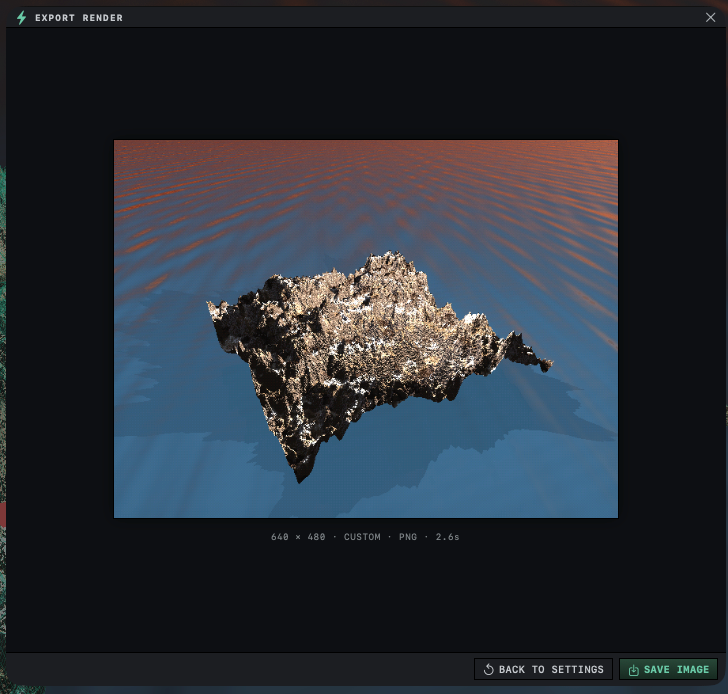
To stop a render before it finishes, click CANCEL or press Escape.
Under the finished picture, a line gives its size, the look, the format and how long the render took. BACK TO SETTINGS returns to the size and format choices and throws the finished picture away, so save it first. Choose the format before you click RENDER, since changing it means rendering again.
Sizes
| Size | Shape |
|---|---|
| 320 × 240 and 640 × 480 | 4:3 |
| 1920 × 1080, 2560 × 1440 and 3840 × 2160 | 16:9, the shape of HD video |
| CUSTOM | Any width and height you type |
With CUSTOM selected, fields for W and H appear. Type a width and a height in pixels. When the render starts, Orbit holds each side between 100 and 8000 pixels to limit render time and memory use. Clicking one of the fixed sizes also copies it into these fields.
A larger size takes longer to render, since every pixel is traced.
PIXEL SCALE
PIXEL SCALE, under the sizes, saves the picture larger than it was rendered by turning each pixel into a square block of pixels. At ×3, a 640 × 480 render is saved at 1920 × 1440, and the caption beside the chips reads SAVES AT 1920 × 1440. The render and the picture in the sheet stay at the size chosen under SIZE, and the file is enlarged when you save it.
A scale that would make either side of the file larger than 8192 pixels is dimmed. Use it to keep the large, sharp pixels of a small render when the picture is shown on a big screen or uploaded to a site that shrinks and recompresses pictures. Those uses are covered in Prepare renders for video and social media.
Formats
PNG keeps every pixel as rendered and is the only format that can keep a transparent background. JPEG makes a smaller file by discarding fine detail. When it is selected, a QUALITY slider appears, set to 0.92 unless you change it. A lower value makes a smaller file and loses more detail. TIFF also keeps every pixel as rendered, but stores it uncompressed, so the files are the largest of the three.
Transparent background
Under BACKGROUND, click TRANSPARENT to save the objects with no sky and no ground plane behind them, for placing over another picture. The objects keep their lighting and highlights, and reflective surfaces still reflect the sky and the ground.
A transparent background needs PNG. Choosing TRANSPARENT while JPEG or TIFF is selected switches the format to PNG, and while TRANSPARENT is on, clicking JPEG or TIFF leaves the format on PNG and shows a line saying so. Click SCENE BACKGROUND to use the other formats again. Turntables and loop exports always include the background.
The RENDER SETTINGS rows
The rows under RENDER SETTINGS summarize what the render will use. PRESET names the render look, SHADING and OUTPUT show its main settings, and EFFECTS shows whether ambient occlusion, glow and depth of field are on. The EFFECTS row does not report lens flare. GEOMETRY gives the number of triangles in the scene.
To change the look without closing the sheet, click EDIT RENDER SETTINGS…. The RENDER SETTINGS sheet opens on top of this one. Choose a render look goes through the looks themselves.
A scene with more than a million triangles shows a warning that the render will wait at BUILDING SCENE before the first tile appears.
Depth of field
Depth of field keeps one distance sharp and blurs what is nearer or farther. Only pictures from EXPORT RENDER show it. The LIVE preview, turntables and Loop Studio exports never show it, because the blur is a separate step that Orbit runs on stills alone. To aim it, right-click the object you want sharp and choose SET DOF FOCUS, which also turns depth of field on. Its settings are under EFFECTS in RENDER SETTINGS, listed in Render settings.
The marks on free renders
In the free version each saved picture carries Made with Orbit 3D in the bottom right corner and Get Orbit 3D at www.orbit-3d.com across the center. A mark too wide for a very narrow picture is left out. The picture in the sheet shows the marks before you save. The full version removes both; see The free and full versions.
Related: The viewport, the preview and the render and Export settings.