Export a wireframe drawing
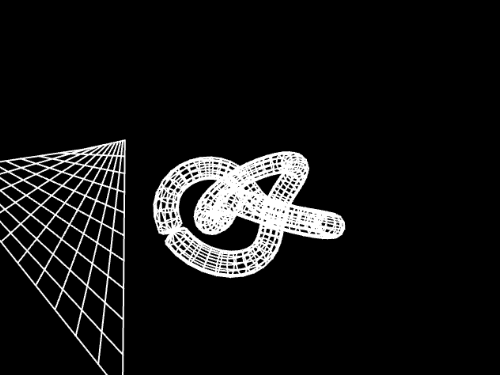
Turn on WIREFRAME MODE in RENDER SETTINGS and the next render draws each object as the lines along its edges, in one color over a flat background. The result saves as a still image from EXPORT RENDER, and the same setting applies to turntables and Loop Studio exports.
Set up the lines
At the bottom right of the window, click the RENDER card.
The RENDER SETTINGS sheet opens.
Click the WIREFRAME heading to open that section, then click WIREFRAME MODE.
LINE WIDTH, LINE COLOR and BACKGROUND appear under it.
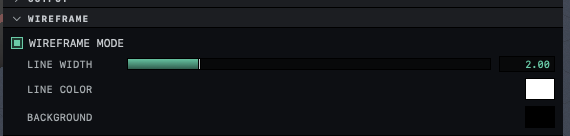
Drag LINE WIDTH to set how thick the lines are.
The width is in pixels of the rendered image, from 0.5 to 8, and starts at 2. It stays the same at any image size and for near and far objects alike.
Click the swatch beside LINE COLOR, and then the one beside BACKGROUND, to choose the two colors.
Each swatch opens a color picker. The lines start white and the background black.
Click DONE.
The viewport does not change. WIREFRAME MODE affects exported pictures only.
Render the drawing
Click EXPORT RENDER, near the right end of the toolbar.
The EXPORT RENDER sheet opens. Nothing in it shows that WIREFRAME MODE is on.
Choose a size under SIZE and a file type under FORMAT, then click RENDER.
When the drawing is complete, SAVE IMAGE appears.
Click SAVE IMAGE, choose a folder and click Save.
WIREFRAME MODE stays on after the export, and Orbit keeps it on the next time it starts, so later renders also come out as line drawings until you turn it off in the same section. Render settings are stored by Orbit and not in the scene, so opening another scene leaves it on as well.
For lines over a clear background, choose TRANSPARENT under BACKGROUND in the EXPORT RENDER sheet. The file is then saved as a PNG, and RENDER SETTINGS shows BACKGROUND HIDDEN WHILE TRANSPARENT EXPORT IS ON. in place of the BACKGROUND swatch. The other choices in the sheet are explained in Render and save an image.
What the drawing shows
The drawing has no shading, so the lines at the back of an object show through the front. A face with four corners is drawn as its four edges, with no diagonal splitting it into two triangles. Objects that are hidden or left out by ISOLATE are not drawn.
Only the edges of objects appear. The sky, the ground plane, lights and materials are missing, since the drawing uses none of the render look. Water has no edges to draw, so it does not appear either. Depth of field, glow and the other effects in RENDER SETTINGS do not apply. In the free version the image carries the same two marks as a shaded render.
A few kinds of object are drawn with their diagonals. Metaballs, objects with ORGANIC on, objects with SMOOTH ANGLE below 180° and objects shaped by a TOPOLOGY deformer such as SHATTER are drawn with every triangle edge, as thin lines 1 pixel wide whatever LINE WIDTH says. In a growth array with VARIANTS above 1, each copy is drawn with the lines of the original plant.
Turntables and loops
The EXPORT TURNTABLE sheet and the PLAYBACK column of Loop Studio each have a WIREFRAME checkbox in their RENDER SETTINGS block. It is the same setting as WIREFRAME MODE. When it is on, the block shows swatches for the line color and the background and a WIDTH slider. MP4 and GIF files cannot store a clear background, so turntables and loops, PNG frames included, use the BACKGROUND color even when TRANSPARENT is chosen for stills. While it is chosen, the background swatch in the block is hidden, although the export still uses that color. See Export a turntable and Export a loop.
The LIVE preview stays shaded while WIREFRAME MODE is on, because its purpose is to show shadows, reflections and materials before you render.
The ruled display of a saddle
A saddle is built from straight lines that cross each other, and its DISPLAY section in the INSPECTOR has a MODE setting with three choices. SHADED shows the surface only, RULED shows only the straight lines, and BOTH, the setting a new saddle starts with, draws the lines over the surface. A HYPERBOLOID has the same setting while TWO SHEETS is off.
MODE changes the viewport only. In the LIVE preview and in shaded renders the saddle is a smooth surface with no lines, whatever MODE says. The Wireframe view of the viewport has no effect on renders either. To put the lines of a saddle in a file, use WIREFRAME MODE. The edges it draws for a saddle are the same straight lines, and U DIVISIONS and V DIVISIONS under RESOLUTION set how many there are. Add objects describes the saddle and its settings.
Related: Render settings, The viewport, the preview and the render.