Organize a scene
As a scene fills up, you can rename objects, gather them into groups that move as one, lock them against accidental drags and hide the ones in the way. With several objects selected, ALIGN & DISTRIBUTE lines them up, and ⌘D makes evenly spaced copies.
Several of these tasks start from a selection of more than one object. Hold Shift and click objects in the viewport, or hold Command and click their rows in OBJECTS. The other ways are in Select objects.
Rename an object
Select the object.
The top of the INSPECTOR shows its name, such as Sphere 1.
Click the name, type a new one and press Return.
The row of the object in OBJECTS shows the new name.
A name holds up to 30 characters, and Orbit keeps the old name when the field is left blank. Lights and groups are renamed in the same field when one of them is selected. The right-click menus have no rename item.
While the name field shows a text cursor, keys such as W and F type letters into it. Click the viewport to leave the field before you use them.
Group objects
A group keeps several objects and lights together. Selecting the group puts one gizmo on all of them, and a drag on it moves them as one.
Select the objects and press
⌘G.A row named Group 1 appears in OBJECTS, with the objects listed under it.
Click the row of the group.
The INSPECTOR shows the name of the group, the number of members and the sections APPEARANCE, MEMBERS and ACTIONS.
Press
W,EorRand drag the gizmo.The whole group moves, turns or grows around the average position of its members.
Double-clicking any member in the viewport also selects its group. A single click selects the member alone, and dragging its gizmo moves that member without the others.
A group cannot contain another group, so ⌘G leaves groups and objects already in a group out of the new one. To move an object from one group to another, right-click it and choose MOVE TO followed by the name of the other group.
To take objects out of their group, select them and press ⇧⌘G. A group left with no members disappears.
Deleting a group does not delete its members. With the row of a group selected, Delete, ⇧⌘G and DISSOLVE GROUP in the INSPECTOR all remove the group and leave the objects in the scene, ungrouped. To delete the objects, click the arrow beside the group row to list its members, select their rows and press Delete.
Lock an object in place
A locked object ignores drags on its gizmo, and its POSITION, ROTATION and SCALE fields are dimmed.
Select the object and press
⌘L.The lock icon beside TRANSFORM in the INSPECTOR is highlighted, and a padlock appears in the row of the object in OBJECTS.
To unlock it, press
⌘Lagain or click the lock icon.The icon is no longer highlighted, and the padlock leaves the row.
⌘L switches only the item you selected last. To switch every selected item at once, right-click one of them and choose LOCK or UNLOCK. Each item flips from its own state, so select items that are all locked or all unlocked. To lock a whole group, select its row and turn on LOCK under APPEARANCE in the INSPECTOR. The members of a locked group show as locked, and ⌘L on one of them switches only that member's own lock, so unlock the group from its row.
The lock only blocks dragging the gizmo and typing values. The TRANSFORM menu in the toolbar, DROP TO GROUND, CENTER TO ORIGIN, ALIGN & DISTRIBUTE and Delete all act on a locked object, and its material and deformers stay editable.
Hide objects
Select the objects or lights and press
H.They disappear from the viewport and are deselected. Their rows in OBJECTS dim, and the eye icon in each row is crossed out.
- To show one again, click the eye icon in its row. To show everything that is hidden, press
⇧H.
Hidden objects are left out of renders as well, and a hidden light gives no light. Hiding is an undo step and is saved with the scene, so hidden objects stay hidden when you reopen the file.
H hides nothing when only the row of a group is selected; it only deselects the row. Click the eye icon in the group row to hide all its members.
Isolate objects
Isolating shows only the selected objects, so you can work on them in a crowded scene.
Select the objects and press
I.Every other object leaves the viewport, and ISOLATED · 2 (with the number of isolated objects) and CLICK OR I TO EXIT appear at the top of the viewport.
- To show the rest again, press
Ior click ISOLATED.
Lights keep lighting the scene while objects are isolated. A render made during isolation shows only the isolated objects.
Isolation leaves the scene itself unchanged. It is not saved with the file and ⌘Z does not end it. New Scene or opening a file turns it off.
Line up and space objects
With two or more objects selected, the INSPECTOR shows the number selected and the section ALIGN & DISTRIBUTE.
Select the objects.
The INSPECTOR shows, for example, 3 above OBJECTS SELECTED.
In ALIGN & DISTRIBUTE, click MIN on the ALIGN Y row.
The bottoms of the objects line up with the lowest bottom among them.
To space them out, click X on the DISTRIBUTE row.
The two objects furthest apart along X stay where they are, and the others move so that the centers are evenly spaced between them.
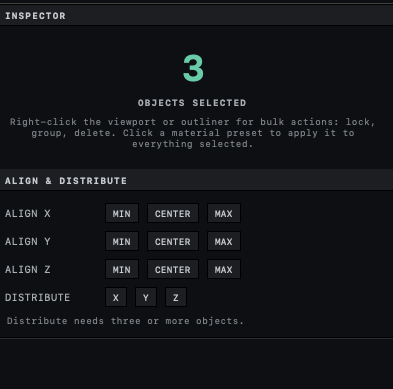
On each ALIGN row, MIN lines the objects up on the lowest edge in the selection along that direction, MAX on the highest edge and CENTER on the middle of the selection. Y runs upward, and X and Z run across the ground. DISTRIBUTE needs three or more objects. Each click is one undo step.
Lights, water and emitters stay where they are. Orbit lines objects up by the edges of their shapes, and these have no shape for it to measure.
Make a row of copies
Select an object and press
⌘D.A copy appears 1.5 m further along X and is selected. Its name is the name of the original with 2 added, such as Sphere 1 2.
Press
Wand drag one of the gizmo's arrows to move the copy as far as you want the copies spaced.The copy follows the arrow and the original stays in place.
Press
⌘Dseveral times.Each new copy lands beyond the last one by the distance and direction you dragged the first copy. The copies form an evenly spaced row. The gap between the original and the first copy also includes the first 1.5 m step.
A copy keeps the material, deformers, lock and group of the original. ⌘D skips the row of a group; select the members to copy them.
To make every copy land 1.5 m along X regardless of how you moved the last one, open SETTINGS in the toolbar and turn off DUPLICATE REPEATS OFFSET under VIEWPORT. For many copies in a fixed pattern, see Repeat objects with arrays.
Related: Move, rotate and scale objects, What undo covers and Keyboard shortcuts and mouse gestures.