Set the sky, sun, fog and clouds
The environment of a scene is the sky and its colors, the sun, clouds, fog, a floor that stretches to the horizon and an optional picture behind it all. You pick a ready environment or roll a random one, then change any part of it in the ENVIRONMENT BROWSER and see the result in the viewport as you go.
Open the environment browser
Click the ENVIRONMENT card at the bottom right of the window, above the RENDER card, or press
⌘E.The ENVIRONMENT BROWSER opens as a floating panel. Presets fill its left side. The right side has a preview sphere at the top, then the settings in sections: SKY, CLOUDS, NIGHT, SUN, GROUND PLANE, WIND, FOG and BACKGROUND.
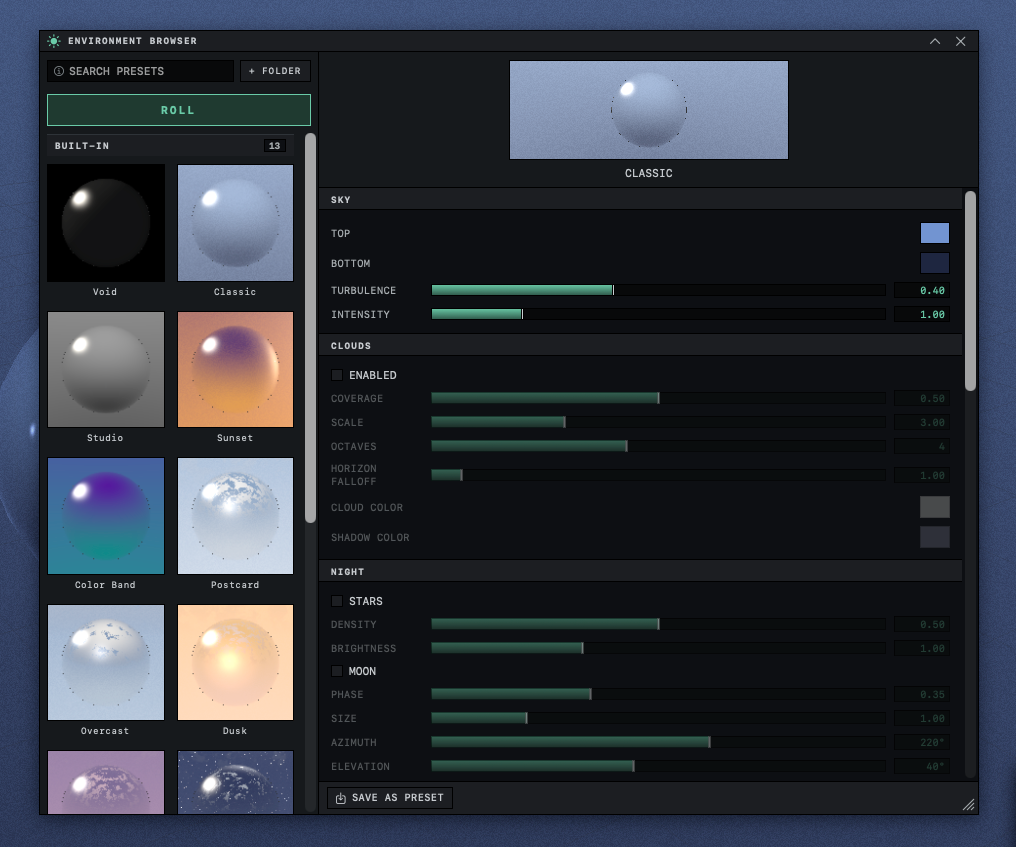
Change a setting on the right side.
The viewport follows each change at once, and the preview sphere redraws shortly after you stop.
The panel has no APPLY or CANCEL button. Each change goes into the scene as you make it, and ⌘Z takes changes back one at a time. The X in the title bar only closes the panel. The environment is saved with the scene.
Start from a preset or a roll
Click one of the cards under BUILT-IN to switch to that environment. A card replaces the whole environment, including any ground plane, fog, wind and background you had set, and returns every setting it does not use to its starting value. None of these cards turns on SUN LIGHT, so objects that were lit only by the sun lose that light. Press ⌘Z to get the previous environment back.
Click ROLL, above the cards, for a random environment built around one of several moods, from a clear day to a storm or a night. Each roll replaces the whole environment too. Every roll turns on SUN LIGHT, which on a night roll is a dim, cool light that stands in for moonlight. A roll is not kept anywhere until you save it. If you click a card while an unsaved roll is showing, Orbit asks Replace the rolled sky? first. To keep a roll, or changes you have made to any environment, click SAVE AS PRESET at the bottom of the panel, as in Save your own presets.
The ENVIRONMENT card shows the name of the last preset you applied, such as Classic sky, and keeps showing it after you change settings. After a ROLL it reads Custom.
Color the sky
The SKY section sets a gradient from TOP, the color straight overhead, down to BOTTOM, the color at the horizon. TURBULENCE breaks the gradient up with noise, and INTENSITY makes the whole sky brighter or darker, along with its reflections in shiny objects.
The Void card gives a black sky that stays black whatever these settings say. To color the sky again, click another card.
Place the sun
The sun has two separate switches. VISIBLE SUN DISC draws the sun in the sky, and SUN LIGHT makes it light the scene from its position and cast shadows, so a disc on its own lights nothing.
In the SUN section, turn on SUN LIGHT.
The objects are lit from the direction of the sun. The shadows it casts show in the LIVE preview and in renders, since the viewport draws no shadows.
Drag AZIMUTH to move the sun around the horizon, and ELEVATION to raise or lower it.
ELEVATION runs from 0°, on the horizon, to 90°, straight overhead. Low values give long shadows.
Set LIGHT INTENSITY for the strength of the light, from 0 to 4.
The sunlit sides of the objects grow brighter or dimmer.
Turn on VISIBLE SUN DISC to show the sun where the light comes from.
The sun appears in the sky, with a glow around it. AZIMUTH and ELEVATION move the disc and the light together.
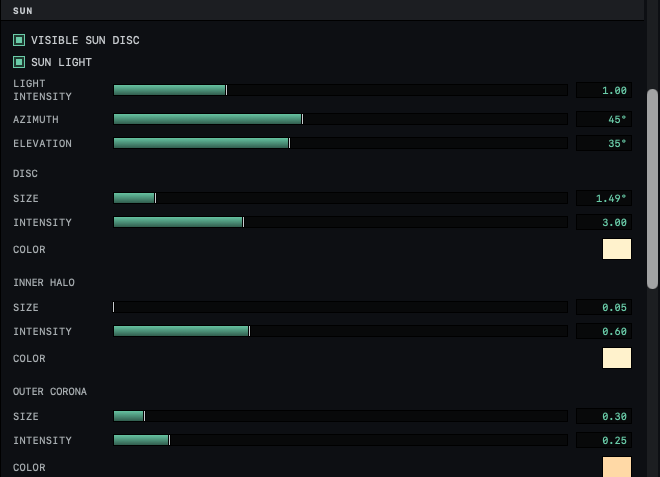
Three groups of settings shape the drawn sun, each with SIZE, INTENSITY and COLOR. DISC is the sun itself, INNER HALO a tight glow around it and OUTER CORONA a wide, soft glow. A low sun with a bright, warm OUTER CORONA gives a sunset look.
The disc COLOR is also the color of the sunlight. The groups are dimmed while VISIBLE SUN DISC is off, so to change the color of the light, turn the disc on, set its COLOR and turn it off again. Sunlight always casts shadows, and their edges are hard. For lights you place yourself, see Light a scene.
Add clouds
Turn on ENABLED in the CLOUDS section to cover the sky with clouds.
| Setting | Effect | Default |
|---|---|---|
| COVERAGE | How much of the sky the clouds cover, from 0 for a clear sky to 1 for overcast | 0.50 |
| SCALE | The size of the clouds | 3.00 |
| OCTAVES | The amount of fine detail in each cloud, from 1 to 8 | 4 |
| HORIZON FALLOFF | Higher values gather the clouds overhead and clear them from the horizon | 1.00 |
| CLOUD COLOR | The color of the clouds overhead | White |
| SHADOW COLOR | The color the clouds take on toward the horizon | Light bluish gray |
Clouds hide the stars behind them. With wind in the scene they drift, as Make things move in the wind describes. For stars and the moon, go to Make a night sky.
Add fog
Fog fades distant parts of the scene into a color. Turn on ENABLED in the FOG section, pick a COLOR, then choose one of three kinds under MODE.
| Mode | How the fog behaves | Settings it adds |
|---|---|---|
| EXPONENTIAL | Thickens smoothly with distance from the camera | DENSITY |
| LINEAR | Begins at START DIST and is complete at END DIST | END DIST |
| LAYERED | Lies low and thins with height, so it gathers in valleys and over water | DENSITY, BASE HEIGHT, SCALE HEIGHT, NOISE AMOUNT, NOISE SCALE |
Every mode has START DIST, the distance from the camera that stays clear, and MAX AMOUNT. In EXPONENTIAL mode at the default DENSITY of 0.035, objects about 20 meters from the camera are roughly half hidden.
In LAYERED mode, DENSITY is the thickness at BASE HEIGHT. The fog is thicker below that height and thins out above it. A small SCALE HEIGHT keeps it close to the ground. NOISE AMOUNT breaks the fog into separate banks, and NOISE SCALE sets their size. With wind in the scene, the banks drift during Loop Studio playback.
MAX AMOUNT caps how thick the fog can get. Below 1, the most distant objects stay faintly visible through it. Make a landscape at dusk sets up layered haze step by step.
Add a ground plane
A ground plane is a flat floor that runs to the horizon in every direction. Turn on ENABLED in the GROUND PLANE section to add it.
| Setting | Effect |
|---|---|
| HEIGHT | The level of the floor, from −10 m to 0 m. The slider does not go above 0. |
| COLOR | The color of the floor, or the first color of its pattern |
| REFLECTION | How strongly the floor mirrors the scene, 0.60 to start |
| ROUGHNESS | Weakens the reflection without blurring it |
| RECEIVE SHADOWS | Shadows fall on the floor while this is on |
| PATTERN | SOLID, CHECKER, HEX TILES, POLKA DOTS, GRADIENT STRIPES, WIREFRAME GRID or CONCENTRIC RINGS |
| ACCENT | The second color of the pattern |
| PATTERN SCALE | The size of the tiles, dots or stripes |
ACCENT and PATTERN SCALE appear once PATTERN is set to anything other than SOLID. A shiny object over a CHECKER floor is the classic chrome shot. In the viewport the floor reflects only the sky, and reflected objects show in the LIVE preview and in renders, for reasons given in The viewport, the preview and the render.
Put a picture behind the scene
In the BACKGROUND section, click CHOOSE and pick an image file.
The file name appears beside IMAGE, and the picture fills the area behind the objects.
Under FIT, click STRETCH, FIT, FILL or TILE.
The picture is resized behind the objects. FILL, the setting it starts with, covers the whole view and crops the edges of the picture. FIT shows the whole picture with the sky in the space left around it, STRETCH covers the view without keeping the picture's proportions and TILE repeats it at its own pixel size.
The picture is a flat backdrop, like a painted matte behind a stage set. It shows only where the camera looks straight past the objects. Reflections in shiny objects and the light in the scene still come from the sky settings, so a chrome ball in front of a beach photo reflects the sky gradient. Set the SKY colors close to those of the picture to make the two agree.
Saving the scene stores a copy of the picture in the file, reduced to 1024 pixels on its longest side if it is larger. When the scene is opened again, Orbit uses that copy and EMBEDDED appears under the name. If the original file is moved before the scene has been saved and opened again, the row reads MISSING · USING SKY and the sky shows in its place. Click CHOOSE to pick the file again, or CLEAR to remove the picture.
Environment settings and presets lists every setting with its range and default.