Modeling problems
- Dragging an object does not move it
- Panning does not work on a trackpad
- The scene is off screen
- The OBJECTS list and the INSPECTOR are gone
- The material cards are dimmed
- Lights you added are gone
- Tab does not make an object editable
- The deformers disappeared
- The BOOLEAN menu is grayed out
- SUBTRACT is missing from the BOOLEAN menu
- The boolean kept the wrong object
- CANCEL in the Scene Wizard did not restore the scene
Each section below starts from a problem you can see while building a scene, such as an object that will not move, a scene that is off screen, a grayed BOOLEAN menu or an object that Tab will not make editable. Within each, the most likely cause comes first.
Dragging an object does not move it
In Orbit, a drag on the object itself only selects it. Objects move when you drag one of the arrows of the move tool, which appear on the selected object.
Select the object, then press
W, or click W among the letters at the top left of the viewport.Three arrows appear on the object, red for X, green for Y and blue for Z.
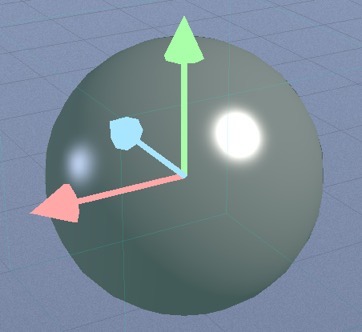
Drag one of the arrows.
The object slides along the direction of that arrow.
If no arrows appear, look at the button near the top of the INSPECTOR. When it reads EXIT POLY EDIT (TAB), the object is in poly edit mode, where a drag on the object edits its mesh and the arrows stay hidden. Press Tab to leave poly edit mode.
An object that does not follow its arrows is locked. The lock icon beside TRANSFORM in the INSPECTOR is highlighted, and the row of the object in OBJECTS shows a padlock. Click the icon, or press ⌘L, to unlock it. When the object belongs to a locked group, the icon and ⌘L switch only the lock of the object itself, so click the row of the group in OBJECTS and turn off LOCK.
To put an object at an exact position, type the values under TRANSFORM in the INSPECTOR, as in Move, rotate and scale objects.
Panning does not work on a trackpad
Orbit pans, sliding the view sideways, only while you drag with the middle button of a mouse. A trackpad has no middle button, and Orbit has no other gesture for panning.
Move the point the camera circles instead. Select the object you want in the middle of the view and press F, or right-click it and choose FOCUS. The view moves to frame the object, and dragging with Option held then circles around it. With nothing selected, F frames every visible object. Scrolling with two fingers zooms in and out.
To come back to a view later, save it as a camera snapshot with ⇧⌘S, as described in Save camera angles.
The scene is off screen
Usually the camera has moved or zoomed away from the objects. Click an empty part of the viewport to clear the selection, then press F to fit every visible object into the view. Right-clicking an empty part of the viewport and choosing FRAME SCENE has the same effect.
If objects are still missing, they may be hidden or outside an isolated view. Objects hidden with H, or with the eye icon in OBJECTS, stay out of view until you show them again, and ⇧H shows all of them. ISOLATED and a number at the top of the viewport mean that only some objects are shown; click it, or press I, to show the rest.
A label such as TOP or FRONT at the top of the viewport means a flat view from one side. Press 1, or click P at the top left, to return to the perspective view.
Camera moves are not undo steps, and ⌘Z leaves the view where it is.
The OBJECTS list and the INSPECTOR are gone
The viewport has been expanded over the side panels, which hides OBJECTS and the INSPECTOR on the right and the column of object buttons on the left. Press ⌘0, or click the button in the top right corner of the viewport, to show them again.
With the toolbar gone as well, the window has switched to Loop Studio, and the LOOP STUDIO tab at the top of the window is selected. Click SCENE beside it.
The material cards are dimmed
The cards in the MATERIALS strip give a material to the selected objects, so they remain dimmed until an object is selected. A LIGHTING preset clears the selection, and when the last thing you clicked is a light or a group, the cards are dimmed too.
Click the object in the viewport or its row in OBJECTS, then click the card. With several objects selected, one click gives the material to all of them.
A missing strip means the dock at the bottom of the window is hidden. Press ⌘J, or click the bar reading MATERIALS / SNAPSHOTS / ENVIRONMENT at the bottom of the window.
Lights you added are gone
A LIGHTING preset replaces every light in the scene, including lights you added or changed. Press ⌘Z to undo the preset and get the earlier lights back. To combine a preset with another light, choose the preset first, then add the light with ADD OBJECT ▸ LIGHT.
Tab does not make an object editable
The kinds of object that cannot become an editable mesh are SPLINE TUBE, EXTRUDE, LATHE, HELIX, MÖBIUS, TORUS KNOT, METABALLS, TERRAIN, WATER, SADDLE, HYPERBOLOID, PARABOLOID and EMITTER. Their INSPECTOR has no MAKE EDITABLE (TAB) button, and Tab does nothing on them. Change them with their settings and with deformers. The kinds that convert, and the reason the others cannot, are in How Orbit builds objects.
If the object is one of the kinds that convert, check the selection. Tab acts on the object you clicked last and does nothing when that is a light or a group.
While a field in the INSPECTOR still shows a text cursor, as it does after you type a value, Tab moves to the next field. In that case, click MAKE EDITABLE (TAB) in the INSPECTOR.
The deformers disappeared
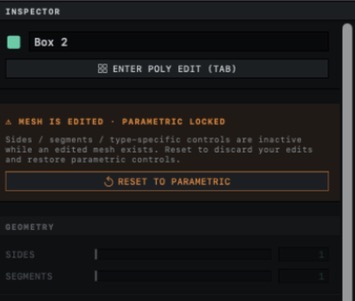
Tab or MAKE EDITABLE (TAB) has probably turned the object into an editable mesh. The conversion keeps the shape the deformers gave the object and removes the deformers, so the DEFORMERS list is empty; it also turns ORGANIC off and puts SMOOTH ANGLE back at 180°. Once you leave poly edit mode, the INSPECTOR shows the settings of the object dimmed under MESH IS EDITED · PARAMETRIC LOCKED.
Press ⌘Z right away to undo the conversion. The object comes back with its deformers and their sliders.
If you have already changed the mesh, press Tab to leave poly edit mode, then click RESET TO PARAMETRIC in the banner and click it again when it reads TAP AGAIN TO CONFIRM. The settings and the deformers return, and every change made to the mesh is discarded.
On an object that was not converted, ⌘Z puts back a deformer removed with the ✕ in its row.
The BOOLEAN menu is grayed out
Hold the pointer over BOOLEAN. The tooltip gives the reason, and when a single object is the problem it starts with the name of that object. The right-click menu drops the boolean items in the same situations, so read the reason in the toolbar tooltip.
First check that two or more objects are selected. Lights and groups do not count. Hold Shift and click a second object in the viewport, or hold Command and click its row in OBJECTS.
Next, one of the objects may be open, or a kind that cannot take part, and the tooltip names it. Turn on CAPS on an EXTRUDE and CAP ENDS on a SPLINE TUBE. A LATHE needs SWEEP at 360° and either THICKNESS or CAP ENDS. THICKNESS closes it only when its profile starts on the axis, and CAP ENDS stays dimmed until THICKNESS is back at 0. Switch off any SHATTER or BURST deformer, and on an object with an array, click ARRAY ENABLED to turn the array off. WATER, TERRAIN, GROWTH, EMITTER, pen lofts, HELIX, MÖBIUS, SADDLE, HYPERBOLOID and PARABOLOID cannot take part at all. Some of their messages suggest adding caps, but these shapes have no caps setting. How Orbit builds objects explains why a boolean needs closed solids.
If the tooltip calls an object an open surface and nothing above applies, a deformer or an edit in poly edit mode has left a hole in it, or the object was imported with one. Select that object alone and switch off its deformers with the checkbox in each row, then select the objects again and look at BOOLEAN.
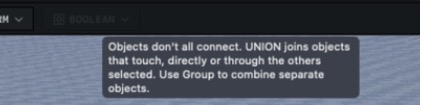
If the tooltip says the objects do not all connect, move them together. For UNION, each object has to touch at least one other, so that together they form one connected group.
When the selected objects total more than 25,000 triangles, the tooltip gives the count. Lower SEGMENTS or PROFILE RES on curved objects, or use OPTIMIZE in poly edit mode on an edited or imported object. The other tooltips, about objects far from the center of the scene or very thin ones, say what to change.
While COMPUTING BOOLEAN… shows in the viewport, the menu stays dimmed until the result appears.
SUBTRACT is missing from the BOOLEAN menu
When BOOLEAN opens but offers only UNION, at least one selected object does not overlap the object you keep, which is the one you selected last. SUBTRACT and INTERSECT need every other object to overlap that one, while UNION needs only a connected group, so it stays.
Move the other objects until each one overlaps the object you keep. If the object you want to keep was not selected last, select the objects again in the right order, as in The boolean kept the wrong object.
Orbit tests the overlap with a box drawn around each object. Two objects can pass that test without sharing any volume, for example a ball placed diagonally beyond the corner of a cube. A subtraction then leaves the kept object uncut and removes the other one, and an intersection stops with the message "No overlap. Nothing to intersect." Press ⌘Z after such a subtraction, then move the objects further into each other.
The boolean kept the wrong object
SUBTRACT keeps the object selected last and cuts the others out of it. Press ⌘Z once to restore all the objects, then select them again with the object to keep selected last. Click one of the others, hold Shift and click the one to keep. Before you choose, check that the BOOLEAN menu reads SUBTRACT · KEEP followed by the name of that object.
In OBJECTS, holding Command while you click a row adds that object to the selection as the one selected last. The right-click item BOOLEAN SUBTRACT does not name the object it keeps, and right-clicking an object that is not selected selects that object alone.
CANCEL in the Scene Wizard did not restore the scene
This happens when the wizard was opened from the command palette, with ⌘K. Opened that way, it does not keep a copy of the scene first, and ROLL replaces the scene without one. CANCEL, the X of the panel and Esc then undo one step instead, which takes back the last change you made before the wizard opened.
Whether or not you rolled, the scene after CANCEL is the one from before that last change. Make that change again if you still want it. When there was no change to take back, for example right after you opened the file, a rolled scene stays in place.
A saved scene file still holds the version you last saved. Do not save over it. Reopen it with File ▸ Open Scene…, and click Discard if Orbit asks whether to save the current scene. The rest of the undo history is still there as well, so ⌘Z steps back further through the changes made before the wizard opened.
To avoid this, open the wizard with File ▸ New from Scene Wizard… (⇧⌘N), with NEW ▸ SCENE WIZARD… in the toolbar or with the SCENE WIZARD card on the WELCOME sheet. The wizard then keeps a copy of the scene. CANCEL restores it, and so does one ⌘Z after ACCEPT, although the camera stays where the last roll framed it. Opening the MATERIAL BROWSER or the ENVIRONMENT BROWSER with M, ⌘E or a card at the bottom of the window also counts as CANCEL while the wizard is open.