Move, rotate and scale objects
Select an object and drag the handles of the gizmo to move it, turn it or change its size, or type exact numbers for it in the INSPECTOR. The TRANSFORM menu in the toolbar turns, mirrors and places the selected objects with single clicks.
Choose a tool
The keys Q, W, E and R, and the chips with the same letters at the top left of the viewport, choose what the gizmo on the selected object does. Orbit starts with W.
| Key | Tool | What appears on the selected object |
|---|---|---|
Q | Select only | No gizmo. Clicks select and nothing moves. |
W | Move | Three arrows |
E | Rotate | Three rings |
R | Scale | A handle on each of the three axes, and a cube at the center |
The handles are red for X, green for Y and blue for Z. Y points up, and X and Z run across the ground. In poly edit and sculpt mode the gizmo is hidden, and in poly edit E chooses edges.
Drag the gizmo
Click the object, then press
W.Three arrows appear on the object. The handle under the pointer turns yellow.
Drag one of the arrows.
The object follows the pointer along the direction of that arrow.
Press
Eand drag one of the rings.The object turns around the axis of that ring. Drag up or down on the red ring, and sideways on the green and blue rings.
Press
Rand drag one of the handles sideways.The object stretches or shrinks along that axis. The cube at the center changes the size evenly in every direction.
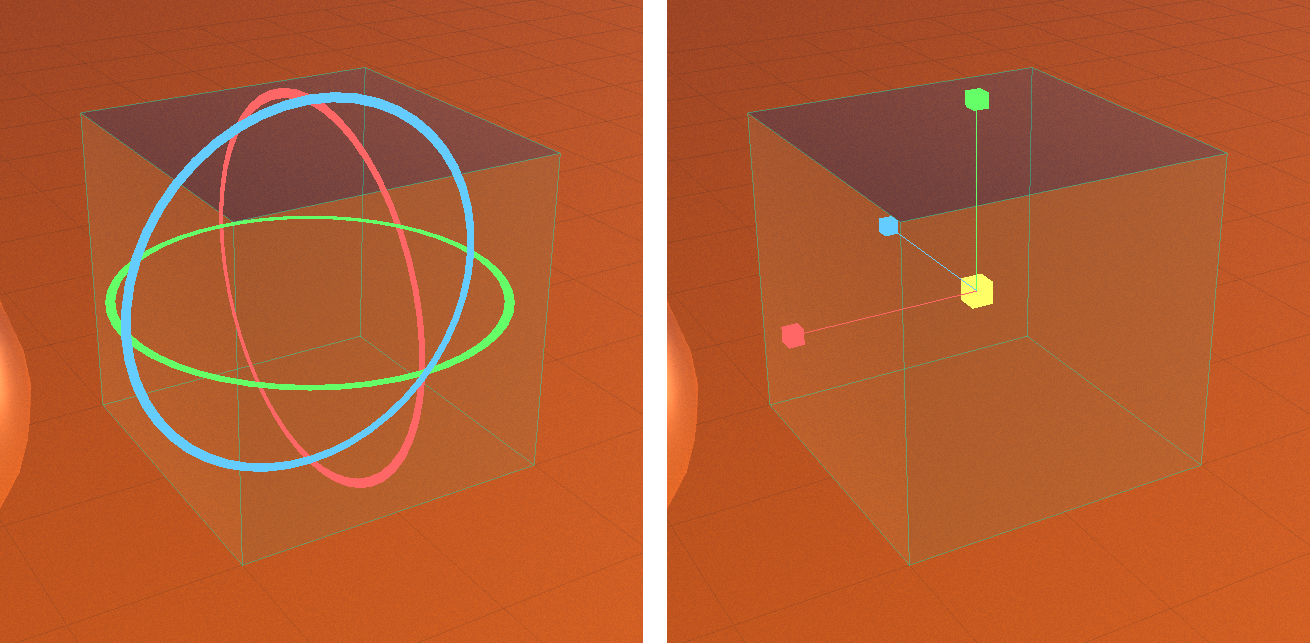
The gizmo points along the X, Y and Z directions of the scene, however the object is turned. After you rotate an object, the red arrow still moves it along the X direction of the scene. The rings of a single object change its matching ROTATION value, so once the object has been turned, the red and blue rings can turn it about a tilted axis. The gizmo stays the same size on screen as you zoom.
A drag on the body of the object only selects it. ⌘Z undoes one gizmo drag at a time.
Type exact values
Select one object, then scroll the INSPECTOR down to TRANSFORM.
POSITION, ROTATION and SCALE each have fields for X, Y and Z.
Double-click the number in a field, type a new value and press Return.
The object moves, turns or changes size at once. Clicking away from the field also enters the value. If the text is not a number, the field goes back to its previous value.
POSITION is in meters and ROTATION in degrees. SCALE multiplies the size of the object along each direction, and a negative value mirrors it. Values are held between −100,000 and 100,000. A scale closer to zero than 0.001 is set to 0.001, or −0.001 for a negative value, because an object with no thickness cannot be shaded.
These fields appear only while one object is selected. With several selected, the INSPECTOR shows how many instead.
One click from the TRANSFORM menu
Select one or more objects and click TRANSFORM in the toolbar. The panel stays open while you click its buttons. Each button acts on every selected object separately, and every click is its own undo step.
| Button | Effect on each selected object |
|---|---|
| +90° X, -90° X, 180° X and the same for Y and Z | Turns it a quarter or half turn about that axis |
| RESET ROTATION | Sets ROTATION back to 0, 0, 0 |
| 2× and 0.5× | Doubles or halves its size in every direction |
| MIR X, MIR Y, MIR Z | Mirrors it along that axis |
| RESET SCALE | Sets SCALE back to 1, 1, 1 |
| CENTER TO ORIGIN | Moves it so its middle sits at the center of the scene |
| DROP TO GROUND | Moves it up or down until its lowest point rests on the ground |
| ALIGN TO GRID | Moves it to the nearest grid point, spaced by GRID CELL in SETTINGS (1 m unless changed) |
| RESET POSITION | Sets POSITION to 0, 0, 0, which for most objects puts the middle at ground level |
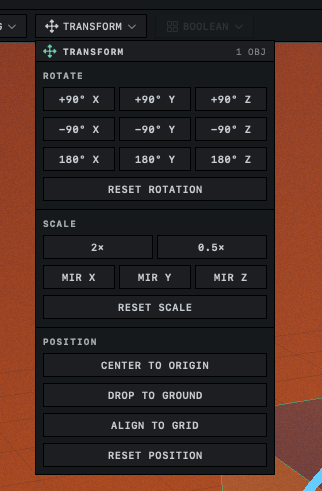
TRANSFORM is dimmed when a light or a group is part of the selection. The panel works on objects only, and it has no way to keep the members of a group together. Move lights and groups with the gizmo.
Snap to the grid and to other objects
Click SNAP in the controls panel at the bottom of the viewport to make gizmo drags stop at set points. Holding Shift during a drag reverses the setting for that drag only.
| Drag | With snapping |
|---|---|
| An arrow | The object stops when its middle comes close to lining up with the middle of another object, or when one of its faces comes close to touching the facing side of another object, and an outline marks where they meet. On the green arrow it also stops with its bottom on the ground or level with the bottom of another object. Away from other objects its position stops on whole grid cells. |
| A ring | The object turns in steps of 15°. |
| A scale handle | The object becomes a whole number of grid cells long on that axis. While the length is under half a cell, it changes freely. |
| The center cube | The size changes in steps of a quarter of the size it had when the drag began. |
Lights do not snap. Orbit remembers the SNAP setting the next time it starts.
Several objects at once
With several objects selected, dragging an arrow moves all of them by the same distance. How they turn and change size depends on the button beside SNAP, which reads MEDIAN or EACH. Click it to switch.
| Setting | Rotate and scale |
|---|---|
| MEDIAN, at the start | The objects turn and grow around their average position, as one arrangement. The gizmo sits at that point. |
| EACH | Each object turns and grows in place, around the point its own POSITION gives. The gizmo sits on the active object. |
With EACH, a scale handle stretches only the active object along its axis, and the others grow evenly in every direction. With MEDIAN, every object grows evenly. To stretch several objects along one axis, scale them one at a time. To move, turn and scale a group as one piece, select its row in OBJECTS, as in Select a group or one of its members.
Lights
W moves a light. On a spot or area light, E shows rings, and dragging one swings the direction the light points while the light stays in place. A point light shines in every direction, so E shows the move arrows. Lights have no size to scale, and R shows the move arrows too. The INSPECTOR of a light has POSITION fields and no rotation or scale fields. To aim a light by numbers, see Light a scene.
Locked objects
An object that ignores the gizmo and shows its TRANSFORM fields dimmed is locked. The lock icon beside TRANSFORM in the INSPECTOR is highlighted. Click the icon, or press ⌘L, to unlock the object, unless the lock belongs to its group. The buttons of the TRANSFORM menu work on a locked object too. Locking several objects or a whole group is in Lock an object in place.