Put an image on an object
You can wrap a picture from a PNG, JPEG or TIFF file around an object, such as a label on a can or a poster on a flat board, and place it so that one copy covers the object. The image becomes part of the object's material, so the work takes place in the MATERIAL BROWSER.
Load an image
Select the object and press
M.The MATERIAL BROWSER opens with the object's material on the right side.
Under COLOR SOURCE, at the top of the settings, click IMAGE.
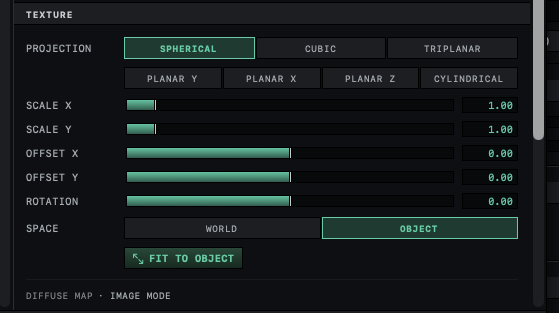
The TEXTURE section shows the placement controls, starting with PROJECTION, and below them DIFFUSE MAP · IMAGE MODE and an empty slot reading DROP IMAGE OR CLICK TO BROWSE.
The first time a material switches to IMAGE, Orbit sets PROJECTION to TRIPLANAR and SPACE to OBJECT, which work on most shapes.
Click the slot, then choose a PNG, JPEG or TIFF file and open it. You can also drag the file from Finder onto the slot.
The file name appears in the slot, and the image appears on the object in the viewport.
Click FIT TO OBJECT.
The image is sized and placed so that one copy of it covers the object.
In the MATERIAL section, drag REFLECTION down to 0 and DIFFUSE up to about 0.8.
The image grows brighter on the object. These values are a starting point.
Step 5 matters on a new object. Its chrome material mirrors the scene (REFLECTION 0.90) and shows very little of its own surface (DIFFUSE 0.08), and the image only colors that surface. Starting from a preset under FLAT also works.
BLEND, below the slot, sets how the image combines with COLOR. At MULTIPLY, the start, COLOR tints the image, so a white COLOR keeps the image's own colors. REPLACE shows the image alone and OVERLAY only lightens. OPACITY sets how strongly the image covers COLOR. The × in the slot removes the image.
Choose a projection
Orbit has no UV unwrapping, and objects do not store where an image sits on their surface. Orbit works out where each point of the image lands from the position of the surface, using the method chosen under PROJECTION. The image always repeats beyond its edges, so it tiles across any surface larger than one copy of it.
| PROJECTION | How the image is laid on | Suits |
|---|---|---|
| SPHERICAL | Wrapped around the object like a map around a globe, with a seam where the two edges meet | Balls and planets |
| CUBIC | Laid flat on each face from the direction that face mostly points | Boxes |
| TRIPLANAR | Laid flat from three directions and blended by the angle of the surface, with no seam | Any shape, including irregular ones |
| PLANAR Y | Laid straight down from above | Floors, tabletops, the top of terrain |
| PLANAR X | Laid from the side, along the X axis | Walls that face along X |
| PLANAR Z | Laid from the front, along the Z axis | Signs and walls that face along Z |
| CYLINDRICAL | Wrapped around the upright axis, with a seam on the side toward negative X | Cans, bottles, columns |
SCALE X and SCALE Y set how often the image repeats, so higher values make it smaller. OFFSET X and OFFSET Y slide it, and ROTATION turns it within the projection, from −180° to 180°.
ROTATION does not move the seam of SPHERICAL or CYLINDRICAL. To hide the seam, set SPACE to OBJECT and turn the object so the seam faces away from the camera.
Keep the image on a moving object
SPACE decides what the image is attached to. With OBJECT, the image moves, turns and grows with the object. With WORLD, it stays fixed in the scene, and an object moved through it shows a different part of the image. A material starts on WORLD until its first image, as step 2 describes.
SPACE and the other placement controls apply to images alone. The NOISE and CELLULAR patterns always stay fixed in the scene, so a moving object slides through its pattern whatever SPACE says.
What FIT TO OBJECT picks
FIT TO OBJECT looks at the shape of the selected object as it stands in the scene, including any scaling.
A shape that is roughly as deep as it is wide and tall, such as a cube or a sphere, gets TRIPLANAR, with one copy of the image across its largest side. A flatter shape gets PLANAR X, PLANAR Y or PLANAR Z, laid on its broad face and stretched to cover that face exactly once, top edge up. The stretch does not keep the image's proportions, so adjust SCALE X or SCALE Y afterwards if the picture looks squeezed.
Each fit sets SPACE to OBJECT and ROTATION to 0, and a single ⌘Z takes it back. It never chooses SPHERICAL, CUBIC or CYLINDRICAL; for a label around a can, choose CYLINDRICAL yourself.
FIT TO OBJECT is dimmed while nothing is selected, since it reads the shape of the selection. On water it does nothing, because water has no surface of points and faces to measure.
Relief from an image
BUMP SOURCE, lower in the TEXTURE section, can also take an image. Orbit reads the light and dark areas of the image as relief and shades the surface as if it had that relief, without changing its shape. STRENGTH sets how deep the relief looks. A bump image uses the same PROJECTION and placement settings as the color image. Switching BUMP SOURCE to IMAGE leaves PROJECTION and SPACE as they are.
When the image file moves or goes missing
Saving a scene stores a copy of each image inside the scene file, reduced to at most 1024 pixels on its longest side. The scene then opens with its images on another Mac, or after the original file has moved, and the slot shows EMBEDDED. While the scene stays open, Orbit keeps using the original. After you reopen it, Orbit uses the smaller copy, so fine detail can look softer. Material presets and objects saved as .orbitobj files store their images the same way.
If the file disappears before a copy has been saved, the slot shows FILE NOT FOUND · USING BASE COLOR, and the object shows its plain COLOR. Click the slot and choose the file again. When the file is there but cannot be read as an image, the slot says so and the object again shows its plain COLOR. Save the file again from an image editor as PNG, JPEG or TIFF.
Orbit ignores transparency in an image, so the clear parts of a PNG do not let the object show through.
Images and the render looks
GLIDE '99 draws each material in its plain COLOR, so images disappear under that look, in the viewport and in renders; see Textures and patterns disappear under GLIDE '99. RAY '95 draws images with visible square pixels, as described in Image textures look blocky.
The other material settings are in Apply and edit materials.