Choose a render look
A render look sets how Orbit shades surfaces in the finished picture, how soft its shadows are, how many colors it holds and whether it has grain and smoothed edges. Orbit has five looks, each named after a year of 1990s computer graphics. You switch between them on the RENDER card.
Pick a look
At the bottom right of the window, click the RENDER card.
The RENDER SETTINGS sheet opens. The row under PRESET highlights the look in use, and the line below the row describes it.
The card shows the name of the current look and EDIT ▸ at its right edge. If the dock along the bottom of the window is hidden, press
⌘Jto show it, or press⌘Kand choose OPEN RENDER SETTINGS.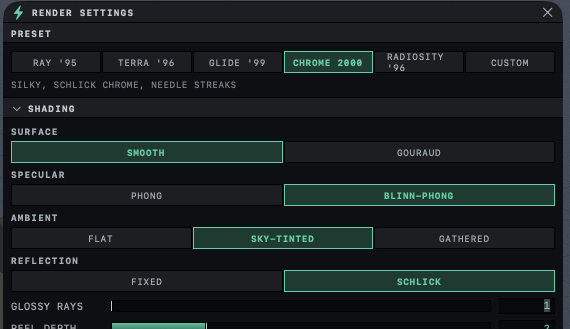
Under PRESET, click a look.
The look applies at once, and the line under the row changes to describe it. The viewport takes on part of the look, such as the darker midtones of RAY '95. Grain, smoothed edges, shadows and reflections of other objects show only in the LIVE preview and the render.
Click DONE, or press Return.
The sheet closes and the card shows the name of the look. For RAY '95 the card reads Raytrace '95.
Each click in the sheet takes effect as you make it. Closing the sheet with the X at the top also keeps your choice. The look applies to the LIVE preview, EXPORT RENDER, turntables and Loop Studio exports. The LIVE preview shows the look before you render; Preview the render while you work has the steps to open it.
The five looks
| Look | What the render shows |
|---|---|
| RAY '95 | Shadows have hard edges, even from area lights, and highlights are small and sharp. Chrome adds up the light it reflects until it turns white. The picture has grain and darker midtones, edges are not smoothed, and image textures look blocky up close. |
| TERRA '96 | The shaded side of an object takes a tint from the sky. Edges are smoothed, and the picture has grain, darker midtones and a faint cool cast. Shadows from area lights have hard edges. It pairs with fog, described below. |
| GLIDE '99 | Light is worked out at the corners of each triangle and blended across it, and highlights are soft. Colors drop to 16 bits, with a fine crosshatch pattern over gradients. Image textures and bumps do not show, although terrain colors that change with height do. Edges are not smoothed. |
| CHROME 2000 | Edges are smoothed, and reflections grow stronger toward the outline of an object and show reflections of their own. The brightest highlights fade toward white without becoming flat white patches. Area lights cast soft shadows. |
| RADIOSITY '96 | Light bounces from one surface onto its neighbors, so a red wall tints the floor beside it, and area lights cast soft shadows. Rough reflective materials show blurred reflections. It traces extra rays from every point the camera sees, which adds to the render time. |
| CUSTOM | Highlighted when the settings match none of the five looks. Clicking it changes nothing. |
Picking any look switches ambient occlusion off. RAY '95, GLIDE '99 and RADIOSITY '96 also switch off glow, lens flare and depth of field, and TERRA '96 switches off depth of field. For the five side by side, and where each one comes from, see The era looks.
Adjust a look and CUSTOM
After you click a look, you can open SHADING or OUTPUT in the same sheet and change any control there. The PRESET row then reads CUSTOM, and the card reads Custom. Changes under EFFECTS, WIREFRAME and PERFORMANCE, and the ANTI-ALIASING setting, leave the look highlighted.
Each look also sets a few things that have no control of their own, such as hard shadows from area lights, blocky textures and how small a highlight can get. Those stay as the last look set them, so a look built from RAY '95 keeps hard shadows and blocky textures after the row reads CUSTOM. Start from the look nearest to what you want. Every control in the sheet is listed in Render settings.
The row also reads CUSTOM the first time Orbit opens, because the settings Orbit starts with are not one of the five looks. Once you pick a look, no control brings those starting settings back, and RESET ALL SETTINGS in SETTINGS leaves the render settings alone.
TERRA '96 and fog
When you click TERRA '96 in a scene with no fog, a banner reads TERRA PAIRS WITH FOG. Click ENABLE to add a thin cool blue fog to the scene, or click ✕ to close the banner and leave the scene as it is. Clicking another look hides the banner.
The fog is part of the scene and is saved in its file. To change or remove it later, see Set the sky, sun, fog and clouds.
Pick a look from the command palette
Press ⌘K and type look. The palette lists LOOK: RAY '95, LOOK: TERRA '96, LOOK: GLIDE '99, LOOK: CHROME 2000 and LOOK: RADIOSITY '96. Choosing one applies the look without opening RENDER SETTINGS. The palette never offers the Terra fog, so add it from the banner or from the environment settings.
Looks and scene files
Orbit keeps the look in its own preferences and uses it for every scene you open. A .orbit file does not record it. A scene made with GLIDE '99 on another Mac renders in whatever look you have selected. Other settings kept this way are covered under Render settings and scene files.
The examples that come with Orbit name the look they were built for when they open. Click APPLY LOOK to switch to it, or KEEP CURRENT to leave your look in place.
Undo does not record a change of look. To go back, click the earlier look again under PRESET.
Related: The era looks and Render and save an image.