Shape a lathe, extrusion or tube with curves
A LATHE, an EXTRUDE and a SPLINE TUBE each take their shape from a curve. In the CURVE EDITOR you can redraw the outline of a lathe or an extrusion, or trace a photo for a lathe. An extrusion outline can also be drawn by hand, and the path of a tube is moved in the viewport.
A lathe spins its profile, a flat half outline, around an upright axis, the way a potter's wheel turns a vase. An extrusion pushes its profile straight out to a set depth. For a tube, a small closed shape called the cross-section is swept along a path in space, the spine. Each procedure below starts with the object selected, so its settings show in the INSPECTOR.
Edit a lathe profile
In the PROFILE section of the INSPECTOR, click EDIT PROFILE.
The CURVE EDITOR opens. The profile sits to the right of a dashed line labeled REVOLVE AXIS (Y), and the shaded left half shows a mirrored copy of it.
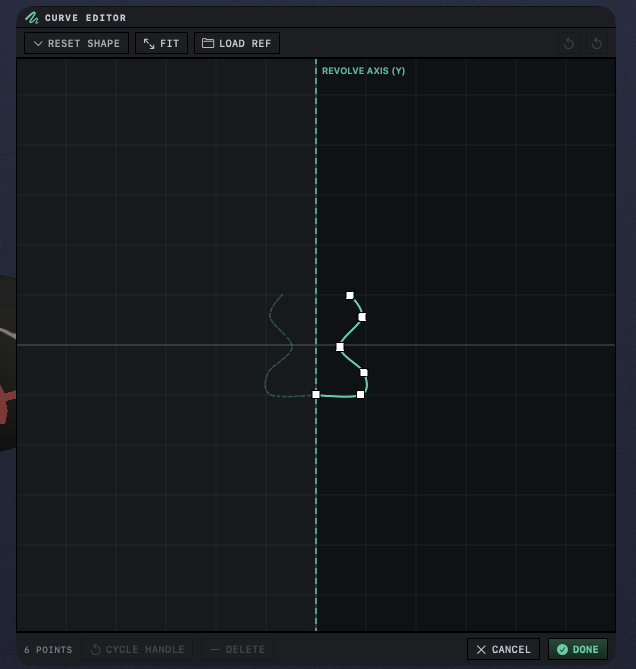
Drag a point to move it.
Points stop at the axis line and cannot cross to its left.
Double-click empty space in the canvas to add a point, and double-click a point to delete it.
A new point joins the nearest stretch of the curve, or extends the curve when you double-click beyond one of its ends. The count at the bottom of the editor changes with each point.
Click DONE, or press Return.
The editor closes and the lathe takes the new profile.
A curve keeps at least three points, and at three a double-click on a point leaves it in place. DELETE, at the bottom of the editor, also removes the selected point. The Delete key does nothing here.
Where the profile touches the axis, the surface closes to a point. An end that stays away from the axis leaves an open rim, like the mouth of a vase.
Sharp and smooth points
A new point makes a sharp corner. To round the curve through a point, click the point, then click CYCLE HANDLE. Each click moves the point to the next of three types, and the type shows at the bottom of the editor, after DELETE. ALIGNED gives the point two handles that stay in line, so the curve passes smoothly through it. With FREE each handle drags on its own, and CORNER removes the handles. Drag a handle to change how the curve bends.
Start from a preset shape
In the CURVE EDITOR, RESET SHAPE replaces the whole curve with a ready shape. For a lathe the list is CUP, BOWL, VASE, BOTTLE, GOBLET and LAMP, and only RING when RING is turned on in the lathe settings. For an extrusion or a tube cross-section it is CIRCLE, SQUARE, TRIANGLE, STAR and BLOB.
A tube also has RESET SHAPE in its CROSS-SECTION section of the INSPECTOR. Choosing a shape there changes the tube straight away, and ⌘Z reverses it.
Trace a photo for a lathe
LOAD REF puts a picture behind the curve so you can copy the outline of a real object. It appears only when the editor is open on a lathe.
In the CURVE EDITOR, click LOAD REF and choose a PNG, JPEG, HEIC or TIFF image.
The picture appears behind the curve, and a bar starting with REF appears above the canvas.
Line up the picture with the controls in that bar. OPAC sets how strongly it shows, SCALE sets its size, and the − and + buttons beside X and Y move it. Place the center line of the object on the axis line.
- Drag the points onto the right edge of the object in the photo, adding points where the outline turns.
Click DONE.
The editor closes and the lathe takes the traced outline.
Orbit does not keep the picture. It is gone the next time you open the editor, and CLEAR in the REF bar removes it before then.
Move around the canvas
Scroll to zoom in or out around the pointer, and drag with the middle mouse button to pan. FIT brings the whole curve back into view, which is the way to recenter it on a trackpad. The editor forgets its zoom and position when it closes.
Undo while the editor is open
The CURVE EDITOR keeps its own history while it is open. The button second from the right end of its toolbar, whose tooltip reads Undo, takes back added and deleted points, preset shapes and CYCLE HANDLE, up to 50 steps. It does not take back a drag. Drag the point back, or click CANCEL.
CANCEL closes the editor and leaves the curve as it was when you opened it. DONE adds the whole edit to the scene as one undo step, so ⌘Z after DONE brings back the earlier curve. CANCEL records an undo step too, one that changes nothing, so the first ⌘Z after it has no visible effect.
Edit an extrusion profile
In the PROFILE section of an EXTRUDE, click EDIT PROFILE. The same editor opens with no axis line and no LOAD REF, and the curve is closed, its last point joining the first. Edit it as for a lathe and click DONE.
To draw the outline by hand:
In the PROFILE section, click DRAW FREEHAND.
The DRAW SECTION sheet opens with the prompt DRAW A CLOSED SHAPE.
Press and drag across the canvas to draw the outline in one stroke.
A second stroke replaces the first.
- Drag SMOOTHING to simplify the stroke. Higher values keep fewer points, and the count beside the slider shows how many remain.
Click COMMIT, or press Return.
The extrusion takes the drawn outline. COMMIT cannot be clicked until the stroke has at least three points.
Sharp corners in the drawing stay sharp in the extrusion. ORGANIC rounds them; see How Orbit builds objects. CANCEL, or Esc, closes the sheet without a change.
Move the spine of a tube
The spine runs through space, so you edit it in the viewport. The CURVE EDITOR handles only the cross-section of a tube, opened with EDIT CROSS-SECTION.
In the SPINE section of the INSPECTOR, click EDIT SPINE.
The button reads EXIT SPINE EDIT, and ADD POINT and DELETE POINT appear below it. The first point of the spine is selected.
Click a spine point to select it, and drag it to move it parallel to the screen. To move it along one direction only, press
Wand drag one of the arrows on the selected point.The tube follows the point as you drag.
- Click ADD POINT to insert a point halfway between the selected point and the next one, or past the end when the last point is selected. DELETE POINT removes the selected point.
Click EXIT SPINE EDIT.
The button reads EDIT SPINE again, and ADD POINT and DELETE POINT are hidden.
While spine editing is on, a click in the viewport selects only spine points, and Esc does not end it. Selecting another object in OBJECTS ends it as well. A spine keeps at least two points. The SPINE header shows the count.
Close the shape for booleans
The BOOLEAN menu takes only closed solids, and each of these shapes can be left open.
| Object | What closes it |
|---|---|
| LATHE | SWEEP at 360° and either THICKNESS above 0 or CAP ENDS on |
| EXTRUDE | CAPS on, in CAPS & BEVEL. It is on for a new extrusion. |
| SPLINE TUBE | CAP ENDS on, in RESOLUTION. It is on for a new tube. |
THICKNESS gives the wall of a lathe an inner surface, so a vase becomes a hollow solid with an inside and an outside to its walls. It closes the lathe only when the profile starts on the axis. CAP ENDS covers each open rim with a flat disc. It stays dimmed while THICKNESS is above 0 or RING is on. A lathe with RING on is closed already, as long as every point of its profile stays to the right of the axis line.
For booleans themselves, see Combine and cut objects with booleans. The reason they need closed shapes is in How Orbit builds objects. Every setting of the three objects is listed in Object types.