Bend, twist and melt objects with deformers
A deformer reshapes an object by a rule, such as twisting it, bending it or letting its base sag and spread. The object keeps its own settings underneath, and each deformer keeps its sliders, so you can change or remove any of them later. Several deformers can work on one object, each on the result of the ones above it.
Deformers belong to one object at a time. Select a single object; with two or more selected, the INSPECTOR shows the selection count and no DEFORMERS section. WATER and EMITTER objects take no deformers.
Add a deformer
- Select the object, then scroll the INSPECTOR down to DEFORMERS.
Click ADD DEFORMER and choose TWIST.
A row named Twist appears above ADD DEFORMER with an AMOUNT slider, and the object twists in the viewport. The section header shows 1 ACTIVE.
Drag AMOUNT.
The twist tightens or loosens as you drag, and
⌘Zreverses the whole drag.
A deformer moves the points the object already has and adds none. A new CYLINDER has a single band of faces up its side, so a twist gives it straight, slanted sides. Raise SEGMENTS in the GEOMETRY section to give the twist points to bend through.
The groups in the menu
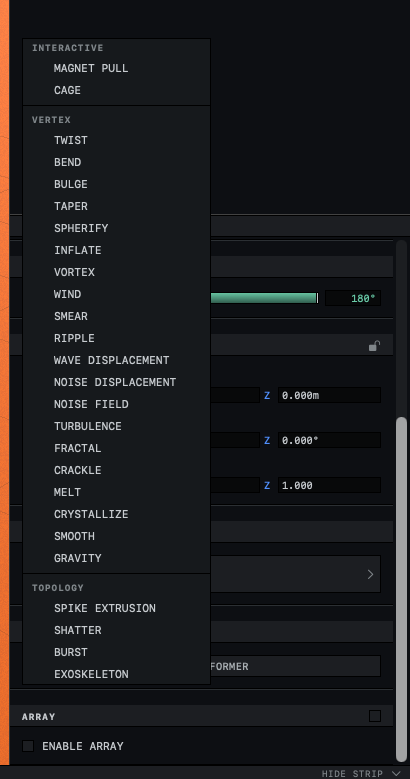
ADD DEFORMER lists 26 deformers in three groups.
| Group | Deformers | What they do |
|---|---|---|
| INTERACTIVE | MAGNET PULL, CAGE | Shaped by hand, by dragging on the surface or moving the points of a lattice. See Push and pull a shape by hand. |
| VERTEX | TWIST to GRAVITY, 20 in all | Move each point of the object by a rule. The surface keeps the same faces. |
| TOPOLOGY | SPIKE EXTRUSION, SHATTER, BURST, EXOSKELETON | Add faces to the object or break it into pieces |
Deformers to start with
Each of these has one or two sliders and gives a clear result on a sphere, box or cylinder.
| Deformer | Effect |
|---|---|
| TWIST | Turns the object around its upright axis, more and more toward the top |
| BEND | Curves the object into an arc. It stops short of the point where the inside of the curve would fold through itself. |
| TAPER | Narrows the top while the bottom keeps its size |
| BULGE | Swells the middle of the object and leaves the top and bottom in place |
| SPHERIFY | Pulls the shape toward a ball. At an AMOUNT of 1 it is a ball. |
| INFLATE | Pushes the surface outward all over. A negative AMOUNT shrinks it. |
| MELT | Lowers the base and spreads it outward. The top does not move. |
| NOISE DISPLACEMENT | Roughens the surface with random bumps |
Every slider of every deformer, with its range and default, is in Deformers.
Stack deformers
The rows run from top to bottom, and each deformer works on the shape the rows above it produced. A new deformer always goes to the bottom of the list.
Add a SPHERE, then choose ADD DEFORMER ▸ SPIKE EXTRUSION.
Spikes stand out from the sphere.
Choose ADD DEFORMER ▸ SMOOTH.
The Smooth row appears below Spike Extrusion, and the spikes turn soft and rounded.
Rows cannot be dragged into a new order. To move a deformer, remove it and add it again, and it lands at the bottom with its sliders back at their default values. For an example of the order changing the result, see How Orbit builds objects.
Switch a deformer off or remove it
The checkbox at the left of a row switches that deformer off. Its sliders fold away and its name dims, and the object shows the stack without it. Click the checkbox again to bring it back with the same values. The ACTIVE count in the section header counts only deformers that are on.
The ✕ at the right of a row removes the deformer at once, without asking. ⌘Z puts it back.
Adding or removing a deformer ends sculpt mode, cage edit mode, spine editing and poly edit mode if one of them is on.
Read the help for a deformer
The ? in each row opens a short description of that deformer and its sliders, usually with an idea of where to use it. Click the ? again to close it.
The help for MAGNET PULL still describes sliders the row no longer has. The row offers SCULPT in their place, described in Push and pull a shape by hand.
Deformers that add or break faces
The four deformers in the TOPOLOGY group change how the surface is built, and they cost more to compute than the others.
SPIKE EXTRUSION picks clusters of faces and pushes each one out into a spike. SHATTER breaks every face off as a loose fragment and moves the fragments apart. BURST throws the fragments outward from the center and stretches each one along its path. Each of these three has a SEED slider. Each seed has its own pattern, and going back to a seed brings its pattern back.
EXOSKELETON builds a second shell around the object, joined to it by a strut at every point. The result has about ten times as many points as the object, although the note in the row says three times. When the row's estimate passes 20,000 points, the note changes to a warning starting with HEAVY: that the sliders will lag. Lower SIDES and SEGMENTS on the object, or remove other deformers from the TOPOLOGY group higher in the stack.
An object with SHATTER or BURST switched on is a set of loose pieces with open edges, and the BOOLEAN menu refuses it. Switch the deformer off with its checkbox before a boolean.
ORGANIC runs after the stack
ORGANIC smoothing rounds the finished shape. Its section sits above DEFORMERS in the INSPECTOR, but the pass runs after the last deformer and rounds everything the deformers made, spikes and struts included. Turn it on with ENABLE SMOOTHING in the ORGANIC section, or press O.
Deformers and editable meshes
Deformers are saved with the scene and stay adjustable. MAKE EDITABLE (TAB) is the exception. It keeps the shape the deformers made, removes the deformers from the list and turns their result into a fixed mesh. ⌘Z right after the conversion brings them back, and The deformers disappeared covers the other ways back. Deformers added to an editable mesh work on top of it and stay adjustable.