Orbit for experienced 3D users
Orbit is a parametric modeler with a CPU ray tracer. It shades with the Phong and Blinn-Phong models, projects image textures onto objects and saves 8-bit images. It has no UV unwrapping, node materials, image-based lighting, HDR output, keyframes or bones.
Axes, distances and the camera
Y is up, and the ground is the plane at Y 0. A new object lands with its lowest point on the ground. Distances are in meters throughout, including the focus distance of depth of field, and no setting changes that. The default sphere has a radius of 1 m and the default box is 2 m on each side, so either one has its center at Y 1, the point a new scene's camera looks at.
The camera orbits a target point. AZ, EL and DIST place it around the target, FOV is the vertical field of view and ROLL tilts the horizon. All five are sliders in the controls panel at the bottom of the viewport. AZ and the sun's AZIMUTH share one compass, with 0 toward −Z and 90 toward +X. AZ gives the direction from the target to the camera, so a sun set to the camera's azimuth sits behind the camera and lights the subject from the front.
| Input | Camera action |
|---|---|
| Hold Option and drag | Orbit around the target |
| Hold Option and Shift and drag sideways | Roll, up to 45 degrees each way |
| Scroll, or hold Option and drag with the right button | Move toward or away from the target |
| Drag with the middle button | Pan, which moves the target with the camera |
F | Fly to the selection and make its center the target. With nothing selected, frame the whole scene |
1 to 4 | Perspective, Top, Front and Side. Pressing 2, 3 or 4 again turns to the opposite side |
Panning needs the middle button, which a trackpad does not have; on a trackpad, select an object and press F to move the target to it. Orbit has no fly or walk mode. Top, Front and Side are orthographic views, in which DIST sets the height of the view in meters, and an Option drag goes back to perspective from the same pose. Up to nine camera angles save with the scene as snapshots; ⇧⌘S adds one, and ⌘1 to ⌘9 fly back to them.
Selection and transforms
Outside the edit modes, clicking an object selects it, and dragging its body does the same without moving it. A drag in empty space selects nothing, since Orbit has no marquee selection. Clicking with Shift held adds an object to the selection or removes it. The last object clicked is the active one; a boolean uses it as the target, and O and ⌘L act on it alone. In the OBJECTS list, a click with Command held adds or removes a row, and a click with Shift held selects a range.
Objects move through the gizmo or through values typed in the TRANSFORM section of the INSPECTOR. W shows the move arrows, E the rotate rings and R the scale handles. Q hides the gizmo. The gizmo lines up with the world axes and has no local or view orientation. On a single object, the handles change the values in TRANSFORM directly.
ROTATION holds Euler angles in degrees, applied in the order Z, X, Y. Each ring adds to one of the three angles. The Y ring turns the object about the world Y axis. The X ring turns it about an X axis that the Y angle has already turned, and the Z ring turns it about the object's own Z axis. Scale acts along the object's own axes, although the scale handles point along the world axes.
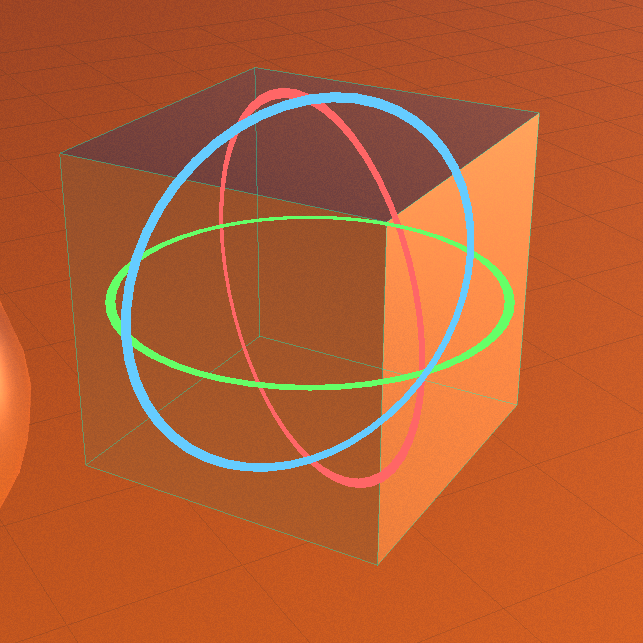
An object's position is its pivot. For most objects that is the center of the mesh; a terrain's position is the base of its heightfield, so sculpting the terrain does not move it. The pivot cannot be moved on its own. With several objects selected, rotation and scale turn about their average position (MEDIAN in the controls panel) or about each object's own position (EACH).
Objects cannot be parented. A group is a flat set of objects and lights with no transform of its own. With its row selected in OBJECTS, the gizmo moves, rotates and scales the members about their average position. A group cannot contain another group.
SNAP in the controls panel turns snapping on for gizmo drags, and holding Shift reverses it for the length of one drag. With snapping in effect, a move stops at the faces and centers of other objects' bounding boxes or at grid lines, a rotation steps by 15 degrees and a scale along one axis keeps the size to whole grid cells. H hides the selection from the viewport and from renders; hiding is saved with the scene and can be undone. I isolates the selection, renders included, until you press I again. Isolation is not saved, and undo does not record it.
Modeling
Shapes added from ADD OBJECT are parametric. Each one is a type plus settings such as SIDES and SEGMENTS, and Orbit rebuilds the shape from those settings whenever one changes. Deformers stack in the object's DEFORMERS section and run from top to bottom in the object's own coordinates, before its position, rotation and scale. A new deformer joins the bottom of the stack. The only way to reorder the stack is to remove a deformer and add it again. Random layouts, such as an array's scatter, a growth's branches or the spikes of SPIKE EXTRUSION, come from a seed, so the same seed rebuilds the same result.
ORGANIC applies one Catmull-Clark subdivision pass after the whole stack, and O toggles it on the active object. It has no level setting. SMOOTH ANGLE, 180 degrees by default, is a shading threshold. An edge where the faces turn by more than this angle shades hard. ORGANIC rounds over hard edges, so while it is on, SMOOTH ANGLE affects only the shading of the smoothed result.
MAKE EDITABLE (TAB), or pressing Tab, bakes the object as it looks, including its enabled deformers, ORGANIC and SMOOTH ANGLE, into an editable mesh. It clears those settings, disabled deformers included, then switches to editing points, edges and faces. The bake keeps quads, and a dodecahedron's pentagons, when every enabled deformer only moves points and neither ORGANIC nor a SMOOTH ANGLE below 180 is on; otherwise the mesh is all triangles. Deformers added after the bake stay live on the mesh. Spheres, boxes, cylinders, cones, tori, platonic solids, text, pen lofts and growths can be made editable, and no other type can. RESET TO PARAMETRIC, clicked twice, discards the mesh and brings the settings back.
Editing includes extrude and inset, face and edge bevels, LOOP CUT, KNIFE, BRIDGE, WELD, SOFT MAGNET and OPTIMIZE, among the tools in Mesh editing tools.
The toolbar's BOOLEAN menu joins, cuts and intersects closed solids. The objects may total 25,000 triangles at most. Each must lie within 1,000 meters of the origin and be at least 0.02 m thick on every axis. An open surface such as a pen loft, a terrain or water has no inside to cut, so it cannot take part. The last object selected is the target, which a subtraction keeps and whose material the result takes. The result replaces the selected objects with one editable mesh, built in world space and placed at 0, 0, 0 with no rotation and a scale of 1, so its pivot is the world origin. Its SMOOTH ANGLE starts at 30 degrees, which keeps the cut edges crisp. SPLIT X, SPLIT Y and SPLIT Z, in an object's context menu, cut one closed solid in two through the center of its bounds.
An array repeats one object as live instances in SCATTER, GRID, RADIAL, LINEAR, TERRAIN or PATH layouts. The copies are not separate objects. Clicking any copy selects the source, and a change to the source changes every copy. An object with its array on cannot take part in a boolean.
There are no bones or skinning. Shape changes come from deformers, the CAGE lattice (2 to 5 points on each axis), sculpting with MAGNET PULL and editing the mesh point by point. MAGNET PULL places a pull wherever you drag on the surface after clicking SCULPT. For how these layers fit together, see How Orbit builds objects.
Materials and textures
Every object except an emitter has exactly one material, a fixed set of values with no node graph. The material's fields are COLOR, SPECULAR, ROUGHNESS, REFLECTION, AMBIENT, DIFFUSE and EMISSION, plus the ANISOTROPY, TRANSPARENCY and INCIDENCE GLOW sections. Surface pattern comes from one COLOR SOURCE (SOLID, IMAGE, NOISE, PLANET or CELLULAR) and one BUMP SOURCE (NONE, IMAGE, NOISE or CELLULAR). The two sources work independently, so a PLANET color can carry a NOISE bump. Applying a preset copies its whole material onto the object, and a later edit to that preset does not change objects that already use it.
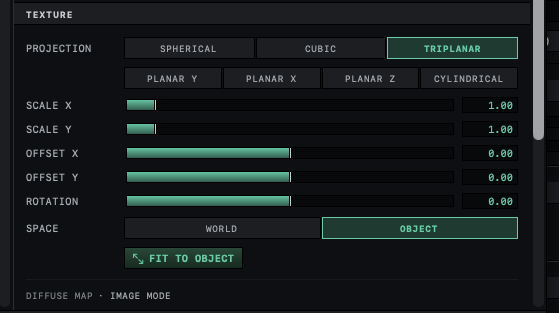
Meshes store no UVs, and Orbit has no UV unwrapping. An image texture is projected from the surface position at render time, and PROJECTION offers SPHERICAL, CUBIC, TRIPLANAR, PLANAR Y, PLANAR X, PLANAR Z and CYLINDRICAL. SPACE keeps the image fixed in the world (WORLD) or moving with the object (OBJECT). A material that first takes an IMAGE color source starts on OBJECT and TRIPLANAR. FIT TO OBJECT chooses a projection and scale that place one copy of the image on the selected object. Textures always repeat and cannot be clamped. NOISE and CELLULAR are solid patterns sampled at the world position of each point, so an object that moves slides through its pattern. Put an image on an object covers the projections in detail.
Images can be PNG, JPEG or TIFF. Their alpha channel is ignored, and their pixel values go into shading with no conversion to linear light. A saved scene carries a copy of each image at most 1,024 pixels on the long side, and it renders from that copy once the scene is reopened.
Lights and shading
Shading is Lambert diffuse plus a Phong or Blinn-Phong highlight, chosen by SPECULAR in RENDER SETTINGS, with no physically based model. ROUGHNESS sets the highlight's exponent to 2 ÷ (roughness² + 0.0001), and the render look caps that exponent, from 16 under GLIDE '99 to 1024 under RAY '95 and CHROME 2000. Below the roughness where the cap takes over, the highlight gets no smaller. Renders treat any AMBIENT value below 0.05 as 0.05.
Lights are POINT, SPOT and AREA, with INTENSITY from 0 to 3 in the INSPECTOR. ATTENUATION starts at OFF, so light does not weaken with distance until you pick LINEAR, INV DISTANCE or INV DISTANCE². An area light's soft shadow comes from its SAMPLES, except under RAY '95, TERRA '96 and GLIDE '99, which trace one shadow ray from its center and so give it a hard shadow. Transparent objects let light through to their shadows according to their TRANSPARENCY. A spot can project an image through its GOBO, in traced pictures only.
The sun is part of the environment. VISIBLE SUN DISC draws it in the sky and SUN LIGHT makes it a directional light. The two are independent, so a scene can be lit by a sun it does not show. The sun always casts hard shadows.
Fill light is set by AMBIENT in RENDER SETTINGS. FLAT adds a constant, and SKY-TINTED colors the fill with the sky in the direction a surface faces. GATHERED traces GATHER RAYS (1 to 32) into the hemisphere above the first surface each camera ray hits, which gives one bounce of real light with color bleed. Gathered light is scaled by each material's AMBIENT value. EMISSION brightens a surface in the picture but lights other surfaces only through those gathered rays. AMBIENT OCCLUSION, when it is on, darkens only the ambient term.
There is no image-based lighting, and no way to load an HDR environment. The sky is procedural, and reflections, SKY-TINTED fill and gathered rays all take their light from it. A BACKGROUND image appears only where the camera sees the sky directly, so set the sky's colors to suit the image. Light a scene and Set the sky, sun, fog and clouds have the details.
The renderer
The CPU ray tracer draws every shaded picture Orbit saves, as well as the LIVE preview. The Metal viewport is a separate rasterizer with no shadows and no objects in reflections, which shades area lights as points and uses at most eight lights. The viewport, the preview and the render compares the three pictures.
REFL DEPTH (0 to 8) is one bounce budget shared by reflections, the ground plane's reflection and light passing through transparent surfaces. Glass shows what is behind it only when REFL DEPTH is at least 1. Transparent meshes pass light straight through without bending it, and only the water object refracts. GLOSSY RAYS above 1 blur reflections and transparency on rough materials.
ANTI-ALIASING is NONE or 2×2 (4 SAMPLES), which fires four jittered rays per pixel and weights them with a Mitchell-Netravali filter. The look Orbit starts with uses NONE. DEPTH OF FIELD is a blur added after the render from each pixel's depth, through a fixed 50 mm lens on a 36 mm sensor whatever the FOV, and only stills from EXPORT RENDER get it. There is no motion blur; the SMEAR deformer streaks the geometry itself.
The five render looks, RAY '95, TERRA '96, GLIDE '99, CHROME 2000 and RADIOSITY '96, bundle these settings with a few that have no control of their own, such as the highlight cap and the shadow rays of area lights, and each is described in The era looks.
Stills render at up to 8000 pixels on a side and save as 8-bit PNG, JPEG or TIFF files. A TRANSPARENT background needs PNG. Orbit writes no HDR or EXR files and no separate passes such as depth or normals. With TONEMAP at CLIP, each sample stops at white. At SOFT CLIP, the renderer keeps highlights up to 64 times white while it works, so glow spreads from their full brightness, and it rolls off everything above 0.8 before the image is saved.
The noise in a render, from ANTI-ALIASING jitter, soft shadows, glossy rays or grain, comes from generators seeded by each pixel's position. The same scene with the same settings renders the same pixels every time.
Animation
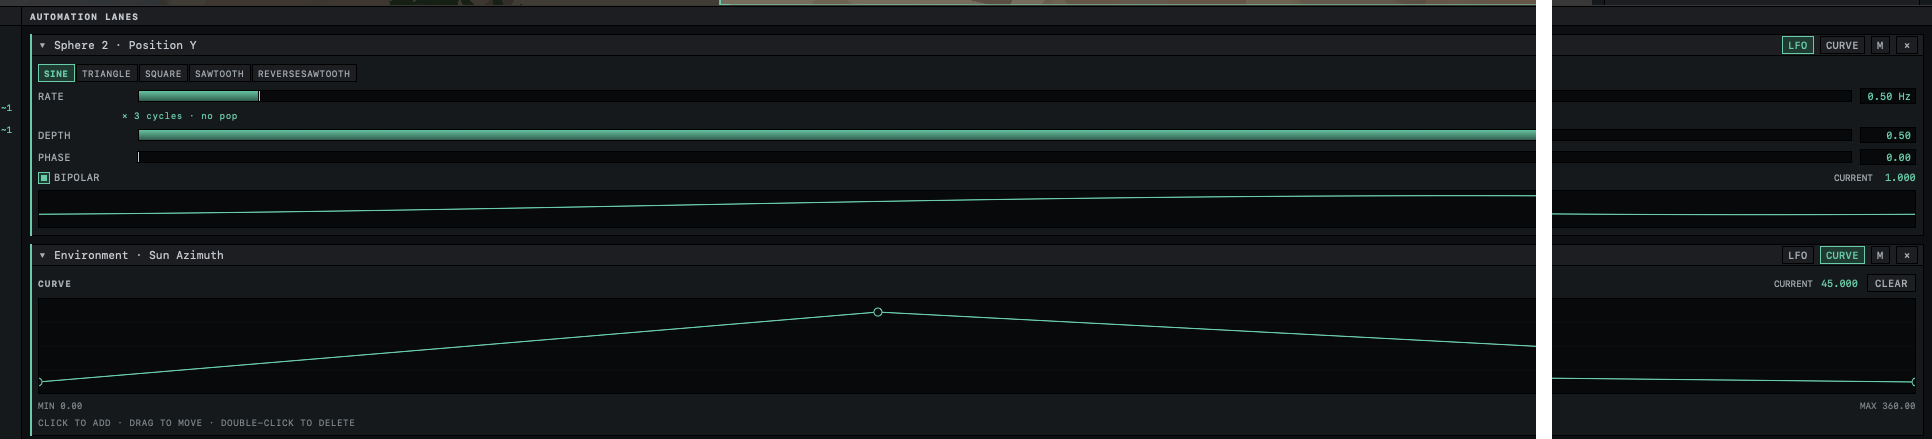
Orbit has no keyframes, timeline or graph editor. The LOOP STUDIO tab animates a scene as a single loop of 2 to 60 seconds. Each lane drives one number, either with an LFO or with a CURVE of points joined by straight lines across the loop. An LFO is a SINE, TRIANGLE, SQUARE, SAWTOOTH or REVERSESAWTOOTH wave, set by RATE, DEPTH and PHASE, that swings around the value the setting has when playback starts.
Lanes reach deformer settings, material values, position, rotation, scale, SIDES and SEGMENTS, four growth settings, light INTENSITY and twelve environment values, among them the sun's azimuth and elevation and the cloud color. The camera cannot be animated, and neither can light color or position, array settings or most colors. For a camera spin, Export Turntable… in the File menu (⇧⌘E) renders a 360° orbit around the target from the current view, and its last frame leads straight back into the first.
Waves on spectral water, glow motes, plants swaying in the wind and drifting clouds and fog banks need no lane. They run on Loop Studio's clock and stand still until ▶ PLAY or an export. Each is fitted to the loop's length so that it closes without a jump; see How loops work. Loop Studio exports GIF at 24 frames per second, and MP4 (H.264) or a folder of numbered PNG frames at 30.
Files and undo
Orbit has one window holding one scene. ⌘N replaces the scene, and closing the window quits Orbit. A .orbit file is JSON. It holds the objects, lights, groups, environment, camera, camera snapshots and Loop Studio lanes, along with the user presets the scene uses and a copy of each image it references. Render settings and app settings stay on the Mac as preferences, so a scene from another Mac renders in your current look.
Import Wavefront OBJ… reads vertices and faces only. The whole file becomes one editable mesh whose faces keep their number of sides. Normals are recomputed, and UVs, groups and .mtl materials are dropped. Export Selected as OBJ… writes world space triangles and normals with deformers, ORGANIC, arrays and transforms applied. It writes no UVs and no .mtl file. Neither direction rescales the model or converts its axes, so 1 m in Orbit is 1.0 in the file. A .orbitobj file carries live Orbit objects, with their settings and deformers, from one scene to another. Exporting geometry in either format needs the full version, and importing does not.
Undo keeps 50 steps, each a snapshot of the objects, lights, groups, environment, Loop Studio lanes and selection. Camera moves, camera snapshots, isolation and render settings are outside undo.
Related: Keyboard shortcuts and mouse gestures, Render settings, Import and export objects and What undo covers.