Loop and video problems
- Wind is set but nothing moves
- PLAY and the export presets are grayed out
- The loop jumps where it repeats
- The water status turns amber
- A lane does not change anything
- The INSPECTOR is missing in Loop Studio
- The frame label reads 16:9 with 4:3 framing
- Loop length and framing reset after reopening
- The video looks blurry or blocky after upload
- The GIF shows bands or flickering colors
Use these sections when scenery stays still in Loop Studio, a loop jumps where it repeats, a lane changes nothing or an exported GIF or video looks wrong.
Wind is set but nothing moves
Waves, drifting clouds, swaying plants and the other effects that move over time stay still while you edit a scene, and the viewport shows the loop's first frame. They move only while Loop Studio plays a loop, and in the frames of an exported loop or turntable.
Click LOOP STUDIO at the top left of the window, then click ▶ PLAY in the PLAYBACK column.
Everything the wind reaches starts to move, and the loop repeats until you click ■ STOP.
If ▶ PLAY is gray or nothing moves during playback, the wind has nothing to act on. STRENGTH in the WIND section of the ENVIRONMENT BROWSER has to be above 0, since DIRECTION alone moves nothing, and the scene needs at least one of the things in this table.
| What the wind moves | What it needs |
|---|---|
| Clouds drift downwind | ENABLED under CLOUDS in the ENVIRONMENT BROWSER |
| Fog banks drift downwind | ENABLED under FOG, with MODE set to LAYERED and NOISE AMOUNT above 0 |
| Plants sway | WIND RESPONSE above 0 in the plant's settings; a new plant starts at 1.00 |
| Glowing motes drift downwind | Motes on a plant (ENABLED under GLOW MOTES) or an emitter, with WIND RESPONSE above 0 |
With swaying plants in the scene, ▶ PLAY first shows ▶ PREPARING and a percentage while Orbit builds each frame of the sway, and the loop starts when that finishes.
The wind does not move water. SPECTRAL waves always move in a loop, and CLASSIC ripples move only when WAVE SPEED in the water's RIPPLES section is above 0. FOLLOW WIND, in the same section, turns the waves to travel with the wind and changes nothing else. If the water stays flat during playback, BUMP ENABLED is off or STRENGTH is at 0 in RIPPLES, and the surface draws no waves. Each of these settings is described in Make things move in the wind.
PLAY and the export presets are grayed out
▶ PLAY and the presets under EXPORT LOOP stay gray while nothing in the scene can move. Give the scene a lane, or something that moves by itself.
In PARAMETERS, at the bottom left of the window, click an object.
Its settings open below it, grouped under headings such as TRANSFORM and MATERIAL.
Click a setting.
A lane for it appears under AUTOMATION LANES, and ▶ PLAY and the presets become available.
Several things move without a lane. Water moves in a loop when it is SPECTRAL, or CLASSIC with WAVE SPEED above 0. Glowing motes and emitters rise and flicker with or without wind, and the effects in the wind table above move once STRENGTH is above 0. Animate a setting with a lane explains the controls on a lane.
The loop jumps where it repeats
Orbit omits the frame at the very end of a loop, which would repeat the first frame, so a jump at the join comes from a setting that does not end where it started. The status at the top of the PLAYBACK column checks each lane. It reads LOOP · NO POP when every lane ends at its starting value, and turns amber, as in LOOP · 2 WILL POP, to count the lanes that jump.
Click the amber status.
The LOOP INTEGRITY list opens with a row for each lane that jumps and the reason. Most rows use Orbit's internal setting names, such as Environment · sunAzimuth for the Sun Azimuth lane.
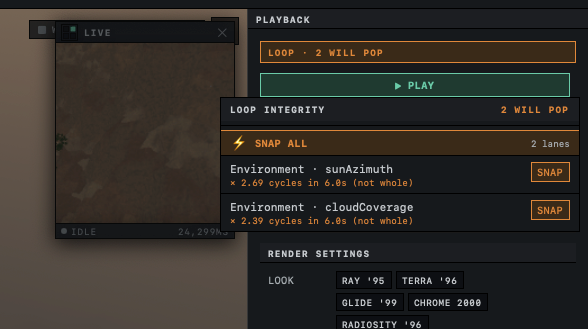
Click ⚡ SNAP ALL to snap every lane in the list, or click SNAP on one row.
Each lane that SNAP can fix leaves the list. When none are left, the list closes and the status reads LOOP · NO POP.
For a lane in LFO mode, the default, SNAP sets RATE to the nearest whole number of cycles in the loop, because a wave that stops partway through a cycle ends at a different value than it began with. In CURVE mode, SNAP moves the last point to the value of the first. The same SNAP also appears on the lane itself, beside the cycle hint of a wave lane or at the top of a curve lane.
A lane set to SAWTOOTH or REVERSESAWTOOTH stays in the list after SNAP. These waves climb or fall steadily and then reset in one step at the end of each cycle, so the setting jumps even when the cycles are whole. Switch the lane to SINE or TRIANGLE. On Sun Azimuth and Cloud Hue, where 360° is the same angle as 0°, a sawtooth at DEPTH 1.00 turns one full circle per cycle and joins up. An object's rotation lanes do not wrap this way, so a sawtooth on them always counts as a jump. The cycle hint on the lane checks only for whole cycles and can read no pop on such a lane, while the list gives a reason such as × 3.00 cycles in 6.0s (not whole).
SNAP keeps RATE between 0.10 Hz and 10 Hz. On a loop longer than 10 seconds, one cycle of a slow lane would need less than 0.10 Hz, so SNAP sets RATE to 0.10 Hz and the lane still jumps. Raise RATE until the hint shows 1.50 cycles or more, then click SNAP again, and it rounds up to two cycles. Shortening LOOP under DURATION also works. At the fast end of the range, lower RATE a little before you snap.
The water status turns amber
A second status in PLAYBACK, separate from the lane check, reports on water whose waves move. WATER · NO POP ✓ means the waves repeat without a jump. The status turns amber in two cases.
When it ends in → SPECTRAL, a water surface in the scene uses the CLASSIC wave model with WAVE SPEED above 0. Classic ripples drift across the surface and never come back to where they started, so the export jumps at the join. Click SCENE, select the water and click SPECTRAL at the top of its RIPPLES section, or choose a sea with the LOOPS badge in the WAVE GALLERY. The tooltip on the status calls this switch Wave Model, but the switch itself has no label; it is the pair of buttons CLASSIC and SPECTRAL. To keep classic ripples, set WAVE SPEED to 0. They stop moving, and still water repeats without a jump.
WATER · NO POP · SWELLS FAST means the waves still repeat without a jump, but the loop is too short for the slowest swells of the sea, and Orbit speeds them up to fit. Lengthen LOOP under DURATION, or lower WIND SPEED in the water's RIPPLES section. At the top WIND SPEED of 8 m/s, a loop of 5.2 seconds or more is long enough, and at the default 3 m/s any loop length is.
A lane does not change anything
Start with the lane's header.
When M is lit, the lane is muted. Orbit skips it in playback and export and shows its title in gray. Click M to turn the lane back on.
A title beginning with Object · in place of an object's name means the object was deleted. The lane stays behind with nothing to move, and it still counts for ▶ PLAY and the loop status. Remove it with ×.
During playback, a ❄ can appear beside the title of a lane that reshapes an object through a deformer, Sides, Segments or a plant's shape. It means rebuilding the object for each frame takes too long or would use too much memory, so the preview holds that shape still. Lanes that move the object or change its material keep playing, and the export builds every frame in full.
Switching a lane to CURVE gives it a flat line at the value the setting had when you made the lane, and it holds the setting at that value until you add points. Click in the curve area to add a point, then drag it up or down. In LFO mode, DEPTH sets how far the wave swings, and at 0 the setting stays where it is.
If the header looks normal, the lane may move a setting that nothing on screen uses. The lanes in this table need a part of the environment turned on in the ENVIRONMENT BROWSER, which you open from the SCENE layout.
| Lane | Needs |
|---|---|
| Cloud Coverage, Cloud Hue, Cloud Saturation, Cloud Lightness | ENABLED under CLOUDS |
| Fog Density | ENABLED under FOG, with MODE set to EXPONENTIAL or LAYERED |
| Fog Base Height, Fog Scale Height | ENABLED under FOG, with MODE set to LAYERED |
| Sun Disc Intensity | VISIBLE SUN DISC under SUN |
| Sun Light Intensity | SUN LIGHT under SUN |
A Cloud Hue lane alone cannot tint white, gray or black clouds, because a color with no saturation has no hue to turn. The default cloud color is white. Give CLOUD COLOR a tint first.
The INSPECTOR is missing in Loop Studio
Loop Studio hides the toolbar, the column of object buttons on the left, the OBJECTS list, the INSPECTOR and the dock along the bottom, with the materials and the ENVIRONMENT and RENDER cards. Its panels take their place.
To change an object, a material or the sky, click SCENE at the top left of the window, make the change, then click LOOP STUDIO again. Lanes, LOOP and FRAMING do not change. SCENE stops playback first and returns each animated setting to its value from before ▶ PLAY.
The frame label reads 16:9 with 4:3 framing
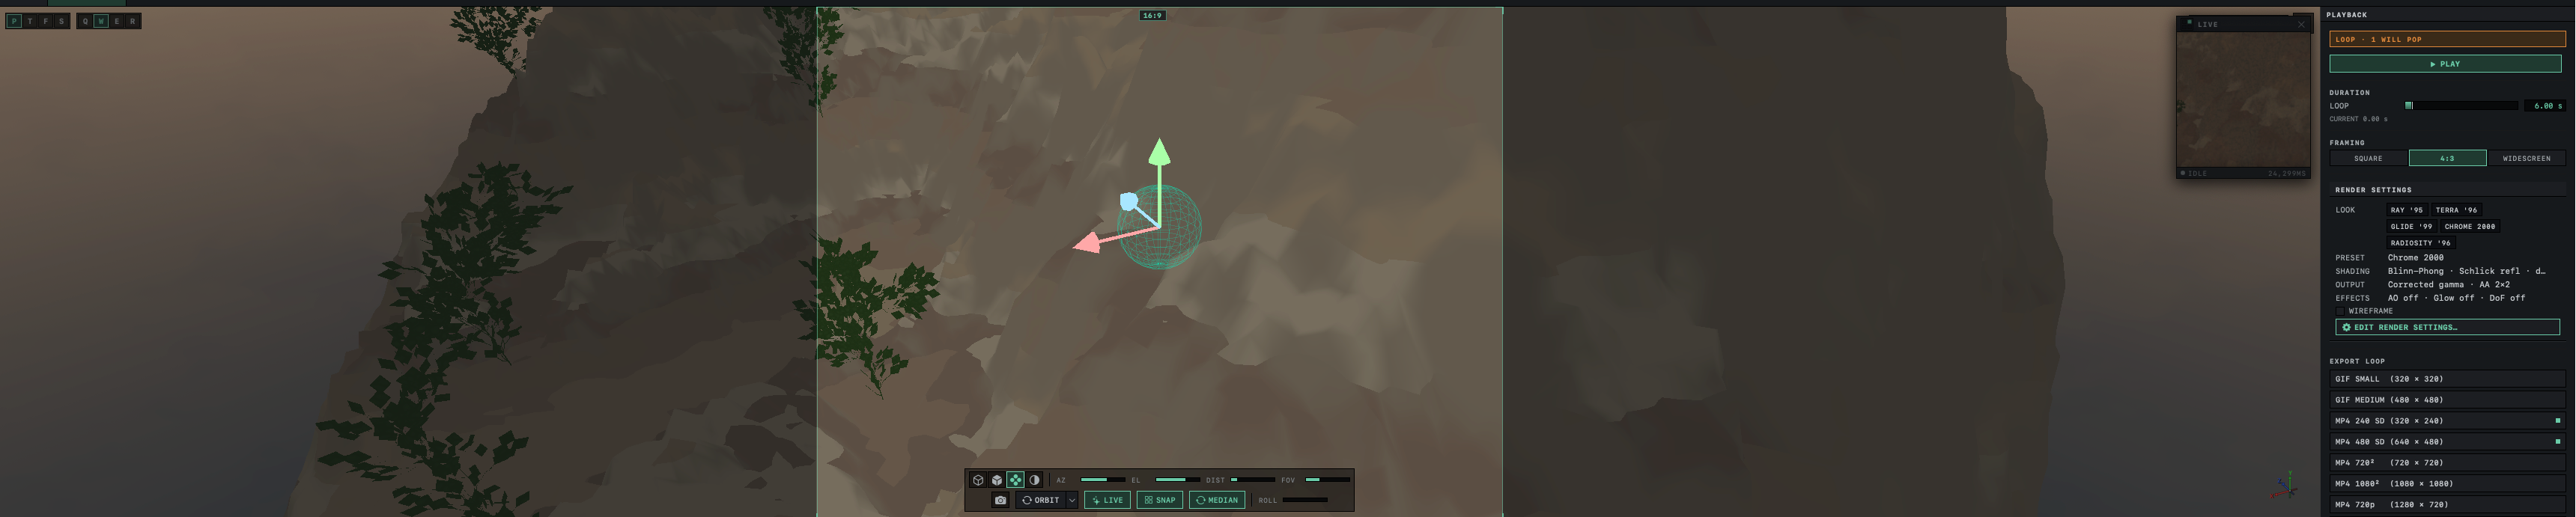
With FRAMING set to 4:3, the label at the top of the frame in the viewport reads 16:9. The label is wrong. It shows 1:1 for SQUARE and 16:9 for the other two framings. The frame itself has the correct 4:3 shape, and the presets marked with a small square, MP4 240 SD (320 × 240), MP4 480 SD (640 × 480) and PNG FRAMES (640 × 480), export exactly the area inside it.
Loop length and framing reset after reopening
A scene file keeps LOOP and FRAMING only when the scene has at least one lane, so a loop made only of moving water, wind or motes reopens at 6.00 s and SQUARE. Set them again after opening, or add a lane and mute it with M before you save. A muted lane moves nothing and never counts as a jump, and it keeps both settings in the file.
The video looks blurry or blocky after upload
Orbit's MP4 files use H.264 video, which stores color at half the width and half the height of the picture. Detail one pixel wide, such as a dither pattern or a thin bright edge, loses its color in that step, and a video site can compress the file again after upload. PIXEL SCALE turns each pixel of the render into a solid square before Orbit encodes the video. From ×2 up, the squares are large enough to keep their color through Orbit's encoding, and the site receives a larger, sharper file to start from.
Under EXPORT LOOP in PLAYBACK, click a scale beside PIXEL SCALE, such as ×3.
The scale is highlighted. For YouTube uploads, the EXPORT TURNTABLE sheet suggests ×3 or more.
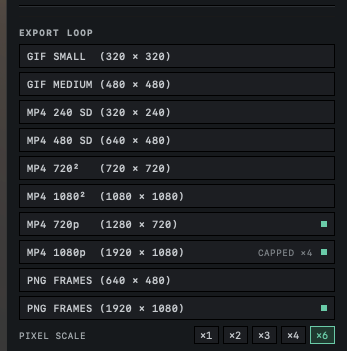
Click an MP4 preset.
Orbit encodes the video at the preset's size times the scale, so MP4 720p (1280 × 720) at ×3 becomes 3840 × 2160.
PIXEL SCALE is not saved and returns to ×1 each time you open Loop Studio, so check it before each export. A preset that would pass 8192 pixels on a side shows CAPPED and the scale it will use, such as CAPPED ×4 on MP4 1080p (1920 × 1080) at ×6. PNG FRAMES always saves one image pixel for each render pixel and ignores the scale.
Enlarging the video later in an editor cannot restore color that the first encoding removed, so Orbit applies the scale before it encodes. For pixel scale on stills and turntables, see Prepare renders for video and social media.
The GIF shows bands or flickering colors
A GIF frame holds at most 256 colors, and Orbit's GIF export lets macOS pick the 256 for each frame separately. A smooth gradient such as a sunset sky can break into visible bands, and the picked colors can differ slightly from one frame to the next, which shows as a flicker over large even areas.
Check the render look first. GLIDE '99 reduces color to 16 bits, so its gradients can band in a still render too. When the PRESET row under RENDER SETTINGS in PLAYBACK reads Glide '99, or COLOR DEPTH in the full render settings (EDIT RENDER SETTINGS…) is 16-BIT or 15-BIT, the bands come from the look. 24-BIT turns the reduction off.
For smooth gradients and steady colors, export an MP4 preset, which is not limited to 256 colors, or PNG FRAMES, which saves every frame as an exact picture.