Apply and edit materials
A material sets the color and highlights of a surface, how much of the scene it mirrors and how much light passes through it. A card in the MATERIALS strip gives the selected objects a preset material, and the MATERIAL BROWSER holds every preset along with the settings for changing them.
Each new object starts with the same material as the Chrome card, a pale mirror finish. A terrain starts with Landscape and water with Water. Clicking Chrome on a new object therefore changes nothing you can see.
Apply a material from the strip
Click the object in the viewport.
The cards in the MATERIALS strip at the bottom of the window are no longer dimmed.

Click a card, such as Gold.
The object takes the material. In the INSPECTOR, the MATERIAL row shows Gold.
To give several objects the same material, hold Shift and click each of them before you click the card. One ⌘Z puts back the materials they had before.
The default Shaded view draws no reflections, so a mirror material such as Gold looks flat in the viewport. The Material view and the LIVE preview show the reflections, as described in See reflections before you render.
Find a material in the MATERIAL BROWSER
Select the object and press
M.The MATERIAL BROWSER opens as a floating panel. The presets fill the left side, sorted under the headings METALS, GLASS, WATER, STONE, TERRAIN, ORGANIC, PLANET, Y2K, FLAT and WEIRD. The settings of the object's material fill the right side, below a preview of the material on a sphere.
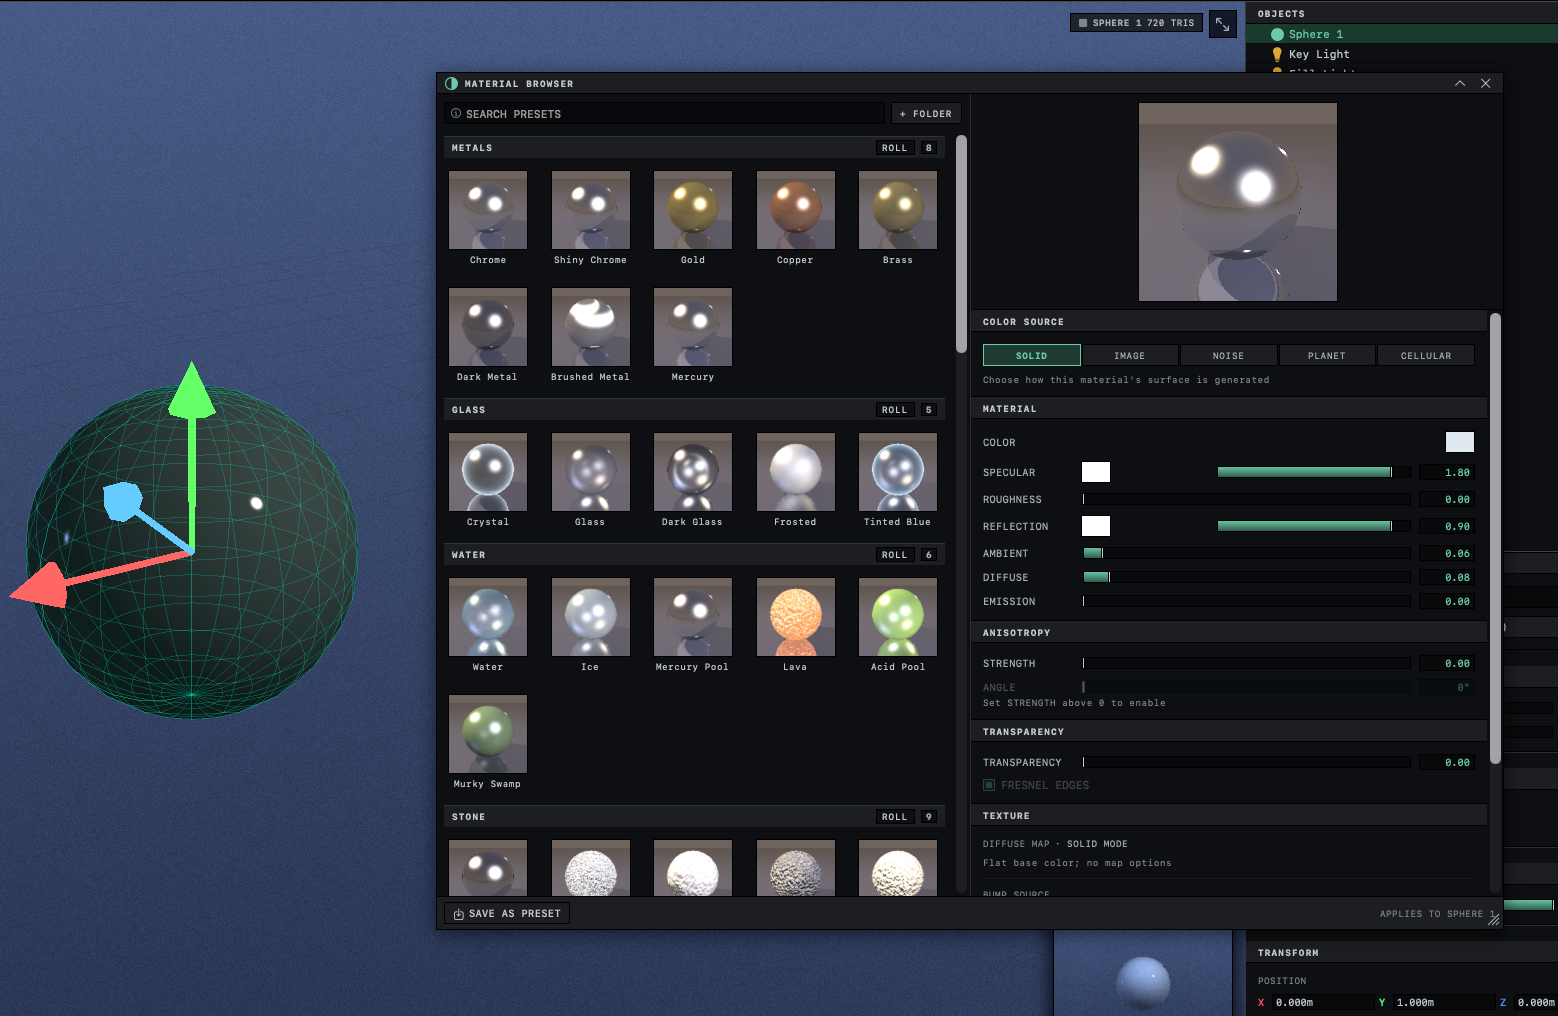
Click a card.
The material goes onto every selected object at once, and the card gets a colored border.
Click the X at the right end of the panel's title bar, or press
Magain.The panel closes. Double-clicking a card applies it and closes the panel in one step.
The browser also opens from BROWSE in the strip, from the MATERIAL row of the INSPECTOR and from EDIT MATERIAL when you right-click an object. To find a preset by name, type in SEARCH PRESETS at the top of the list. ROLL, beside each heading, makes a random material from the presets under that heading and applies it.
The browser has no APPLY button. Each click or change reaches the selected objects as soon as you make it. The bottom of the panel reads APPLIES TO and the name of the object you selected last, although changes reach all the selected objects.
Pressing M while the SCENE WIZARD is open cancels the wizard and removes the scene it built, so click ACCEPT in the wizard first.
Change the look of a material
Select the object, press M and drag the sliders on the right side of the browser. The object and the preview change while you drag, and each drag is one step for ⌘Z. To type a value, click the number beside a slider. A color swatch opens a color picker when you click it.
| Setting | Section | What it changes |
|---|---|---|
| COLOR | MATERIAL | The color of the surface itself. |
| DIFFUSE | MATERIAL | How strongly that color shows where light falls on the surface, from 0 to 1. |
| SPECULAR | MATERIAL | How bright the highlights are, from 0 to 2. The swatch beside it tints them. |
| ROUGHNESS | MATERIAL | How large and soft the highlights are, from 0 to 1. Low values give small, sharp highlights. |
| REFLECTION | MATERIAL | How much of the scene the surface mirrors, from 0 to 1. The swatch beside it tints the reflection. |
| EMISSION | MATERIAL | Makes the surface glow in its own color without any light on it, from 0 to 2. |
| TRANSPARENCY | TRANSPARENCY | How much light passes through the surface, from 0 to 1. |
| FRESNEL EDGES | TRANSPARENCY | Makes a transparent surface more solid toward its outline, where you look along it. It starts on, and it is dimmed while TRANSPARENCY is 0. |
| ENABLED | INCIDENCE GLOW | Adds a glow that shifts from the FACE color, where the surface faces the camera, to the EDGE color at its outline. It shows even with no lights. INTENSITY sets its strength and POWER how closely it keeps to the outline. |
The chrome material of a new object has REFLECTION at 0.90 and DIFFUSE at 0.08. On that material a new COLOR shows only faintly. Lower REFLECTION or raise DIFFUSE to bring the color out.
Each render look limits how small a highlight can get. Below a certain ROUGHNESS, which depends on the look, lowering it further makes no difference.
Most settings that have no effect at the moment stay on the panel, dimmed, and some show a short line under them that says what brings them into play.
Glass and other transparent materials
Start from the GLASS heading, or raise TRANSPARENCY on any material. In the viewport a transparent object always stays faintly visible, so that it can be found and clicked.
Transparent objects pass light through without bending it. A glass ball shows what is behind it in its true place, with nothing shifted or turned upside down. Only water bends light, through its IOR setting (Refraction, depth color and foam).
In a render, light passing through a surface counts against REFL DEPTH, the number of bounces a ray may make, in the SHADING section of RENDER SETTINGS. A glass ball needs a REFL DEPTH of at least 2, one for its front and one for its back. Several of the render looks set it to 1, and the glass then renders solid. Glass renders solid gives the fix.
Materials under GLIDE '99
The GLIDE '99 render look lights each triangle at its corners and blends the plain COLOR of the material across it. Image textures, the NOISE, CELLULAR and PLANET patterns and any bump drop out, in the viewport and in renders. To keep the rest of the look and get them back, follow Textures and patterns disappear under GLIDE '99.
Presets are copied onto objects
Clicking a card copies the whole material onto the object. The object keeps no link to the preset, so later changes to a saved preset do not reach objects that already wear it. Select those objects and click the card again to give them the changed version. Saving and changing presets is covered in Save your own presets. Images have their own page, Put an image on an object.