Make a night sky
A night scene starts from a dark sky with stars and a moon. It then needs a dim light to stand in for moonlight, and it can take the glow and lens flares from the render settings. The sky settings are all in the ENVIRONMENT BROWSER, introduced in Set the sky, sun, fog and clouds.
Start from a night preset
Press
⌘E, or click the ENVIRONMENT card at the bottom right of the window.The ENVIRONMENT BROWSER opens.
Under BUILT-IN, click Nightfall.
The sky turns deep blue, with stars, thin clouds and a moon partly lit on one side.
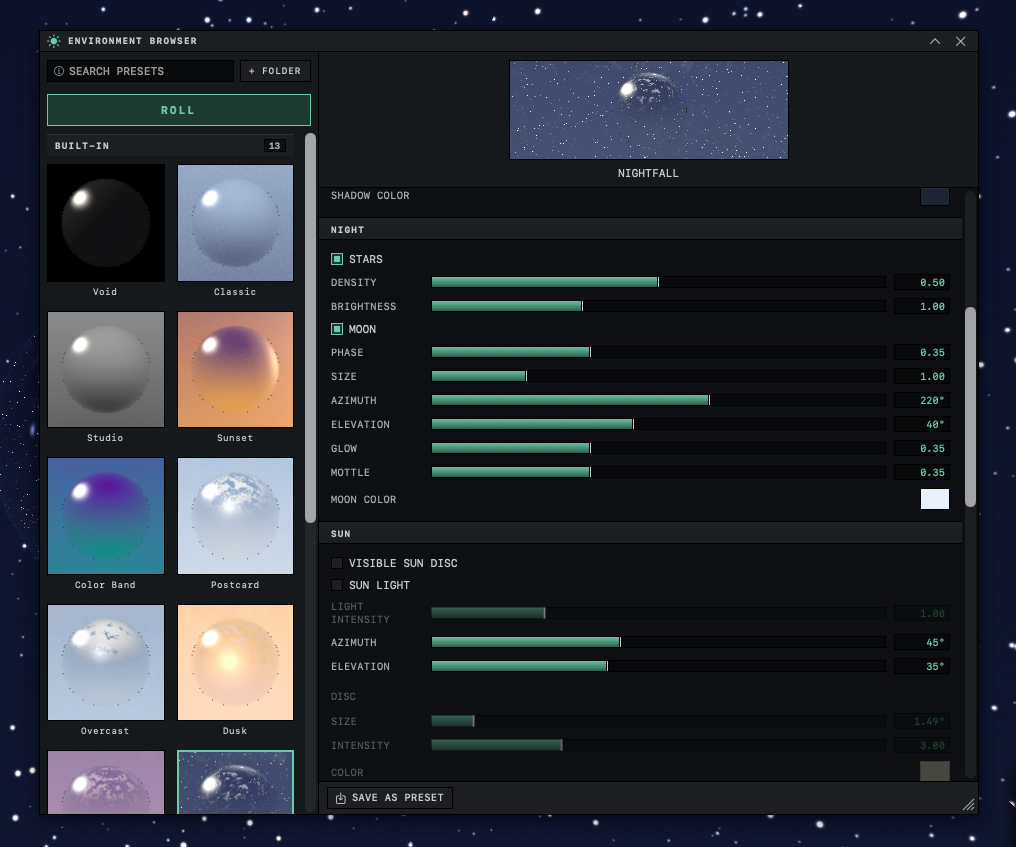
Nightfall replaces the whole environment, so any ground plane, fog, wind or background you had set is turned off. Lights you placed in the scene stay as they were. Nightfall turns off SUN LIGHT, which leaves objects lit only by the scene's own lights, and without any they render dark against the sky.
ROLL can also give a night sky, since some of its random moods are nights. A night roll always has stars and often a moon, and it turns on SUN LIGHT as a dim, cool light. You cannot ask ROLL for a night, so click it until one comes up. To build a whole night landscape at once, choose NIGHT or ALIEN NIGHT under ENVIRONMENT in the Scene Wizard, as in Start from an example or the Scene Wizard.
Stars
Turn on STARS in the NIGHT section to fill the sky with stars. DENSITY sets how many there are, from 0 to 1. BRIGHTNESS runs from 0 to 3 and sets how bright they shine.
Stars are drawn behind the clouds, so a cloudy sky hides most of them. Lower COVERAGE under CLOUDS, or turn the clouds off, to see more. The pattern of stars has no setting of its own. Each ROLL that gives a night sky scatters them in a new pattern, along with everything else in the environment.
The Void card is no use for a night sky. Its sky renders black and shows no stars or moon, whatever the NIGHT section says.
The moon
Turn on MOON in the NIGHT section to add a moon, then shape it with the settings below the switch.
| Setting | Effect | Default |
|---|---|---|
| PHASE | How much of the moon is lit. 0 is a new moon, 0.5 a full moon and 1 a new moon again. | 0.35 |
| SIZE | The size of the moon in the sky, from 0.20 to 4.00 | 1.00 |
| AZIMUTH | Where the moon sits around the horizon, in degrees | 220° |
| ELEVATION | How high the moon stands, from 0° at the horizon to 90° overhead | 40° |
| GLOW | The halo around the moon | 0.35 |
| MOTTLE | The dark patches on its face | 0.35 |
| MOON COLOR | The tint of the moon | Pale blue white |
The moon is drawn in front of the clouds. It is part of the sky picture and gives no light, so a moonlit look needs a light of its own.
Light the scene by moonlight
The sun can act as the moon's light while its disc stays hidden. AZIMUTH and ELEVATION mean the same for the sun and the moon, so matching them puts the light where the moon is.
In the SUN section, turn on SUN LIGHT and set LIGHT INTENSITY low, around 0.3.
The objects are lit dimly from the direction of the sun.
Set the sun's AZIMUTH and ELEVATION to the values of the moon in the NIGHT section.
The light falls from the moon's side of the sky.
Turn on VISIBLE SUN DISC, set the COLOR under DISC to a pale blue, then turn VISIBLE SUN DISC off again.
The light takes on the blue tint and the sun disc disappears from the sky. Place the sun explains why the color is set this way.
For lamps, windows or a glowing sign, add lights of your own (Light a scene). A point light inside the frame at an intensity of 1.5 or more can also give a lens flare.
Fireflies
Glowing motes drift around plants or rise from an EMITTER object, and they show best against a dark sky. They glow in the picture but light nothing around them. A Scene Wizard landscape with a night sky adds them by itself. Add fireflies and glowing motes shows how to add them by hand.
Glow and lens flares
Two effects in the render settings work well at night. GLOW / BLOOM makes bright spots, such as motes, glowing materials and strong highlights, bleed a soft glow into the dark around them. LENS FLARE adds the sprite flare of 1990s renders, a starburst with a row of ghost shapes across the frame.
Click the RENDER card at the bottom right of the window, then click EFFECTS to open that section.
The switches for GLOW / BLOOM and LENS FLARE appear.
Turn on GLOW / BLOOM.
THRESHOLD, INTENSITY and RADIUS appear below it. Lower THRESHOLD if too little glows, and raise RADIUS for a wider glow.
Turn on LENS FLARE, then set INTENSITY and the number of GHOSTS.
STARBURST is on at the start, and ANAMORPHIC adds a long blue streak across the frame.
Click DONE, then click LIVE in the controls panel at the bottom of the viewport to see the effects.
The viewport never shows them. They appear in the LIVE preview and in renders and exports.
A flare comes only from a visible sun or from a point or spot light of intensity 1.5 or more, and only while the source is in or near the frame and nothing blocks it. The moon and area lights never flare, and there are no flares in the flat views that the keys 2 to 4 choose. On a Nightfall sky the sun disc is off, so a flare needs a bright point or spot light in the frame.
These effects belong to the app and are not saved in the scene file. They stay on for every scene you open until you turn them off, or until you click RAY '95, GLIDE '99 or RADIOSITY '96 under PRESET, which turn both off. Choose a render look covers the rest of the render settings.