Render problems
- Chrome looks gray in the viewport
- The render looks different from the viewport
- The render is framed differently from the viewport
- The LIVE preview does not update
- The RENDER button is grayed out
- The edges are jagged
- The render is slow
- Glass renders solid
- Textures and patterns disappear under GLIDE '99
- Image textures look blocky
- Glow or lens flare does not appear
- The scene goes dark after clicking a card under BUILT-IN
- A scene opens with a different look
- The finished picture is gone
- The saved image carries marks
Problems with how Orbit draws, previews and renders a scene are listed here by what you see, such as chrome that looks gray in the viewport or marks on a saved image.
Chrome looks gray in the viewport
Chrome has almost no color of its own. Nearly all of its look comes from what it reflects, and the Shaded view, which Orbit uses whenever a scene opens, draws no reflections. In that view a chrome object shows only its dim color and the highlights from the scene's lights, so it looks gray.
Among the four view icons at the left end of the controls panel, at the bottom of the viewport, click the fourth, Material. Reflective objects then mirror the sky. The viewport never shows one object reflected in another. For that, click LIVE in the same panel, which opens a small traced preview, or render the scene.
Most new objects start with a material identical to Chrome, so a newly added object looks gray too, and applying the Chrome card to it makes no visible difference. Terrain and water start with different materials.
The render looks different from the viewport
The viewport draws no shadows, shows no object reflected in another and lights each area light from a single point. It follows only a few settings of the render look, such as GAMMA, SURFACE and SPECULAR, and grain, smoothed edges and glow appear only in traced pictures. The reasons, with a comparison of the three pictures, are in The viewport, the preview and the render.
Click LIVE in the controls panel to keep a traced preview of the view open while you work.
The view icons change the viewport alone. A scene seen in Wireframe still renders with its surfaces. Line drawings come from WIREFRAME MODE in RENDER SETTINGS, as Export a wireframe drawing describes.
The render is framed differently from the viewport
A render takes in the same height of the scene as the viewport, and the size chosen in EXPORT RENDER sets its width. A picture narrower in shape than the viewport, such as a 640 × 480 render from a wide window, therefore cuts off part of each side, and a wider one takes in more.
To see where the picture's edges fall, click SETTINGS at the right end of the toolbar and turn on RENDER FRAME under VIEWPORT HUD. The viewport then dims everything outside the frame, and zooms out when the frame is wider than the viewport, so the frame shows exactly what renders. For composing with it, see Frame the shot.
The LIVE preview does not update
The LIVE preview traces only when you pause. After a change it waits 350 milliseconds, and each further change starts the wait again, so the status line under the picture reads QUEUED for as long as you keep dragging a slider. The preview also stops while you move the camera and draws again when the camera comes to rest. While ORBIT turns the camera, the preview waits until ORBIT stops. The number at the right end of the status line is how long the last trace took, in milliseconds.
A change that would not alter the preview's picture starts no trace. The preview never shows depth of field, WIREFRAME MODE or a transparent background and ignores changes to them; check those in a render from EXPORT RENDER. It also ignores THREADS and always uses half of the Mac's cores.
If no preview is showing, click LIVE in the controls panel. The preview opens and traces the scene at once.
The RENDER button is grayed out
RENDER, at the bottom right of the EXPORT RENDER sheet, stays dimmed while the scene has no objects. Lights do not count, so a new scene cannot be rendered until you add an object. Close the sheet, add one and open EXPORT RENDER again.
The edges are jagged
A render smooths the stepped edges of objects only when ANTI-ALIASING is set to 2×2 (4 SAMPLES), which TERRA '96, CHROME 2000 and RADIOSITY '96 do. RAY '95 and GLIDE '99 set it to NONE, and so does the look Orbit starts with, which reads CUSTOM under PRESET. In the EXPORT RENDER sheet, the OUTPUT row under RENDER SETTINGS includes AA off when a render will not be smoothed.
At the bottom right of the window, click the RENDER card.
The RENDER SETTINGS sheet opens.
Click OUTPUT to open the section, then under ANTI-ALIASING click 2×2 (4 SAMPLES).
The look under PRESET stays selected, because smoothing is not one of the settings that identify a look.
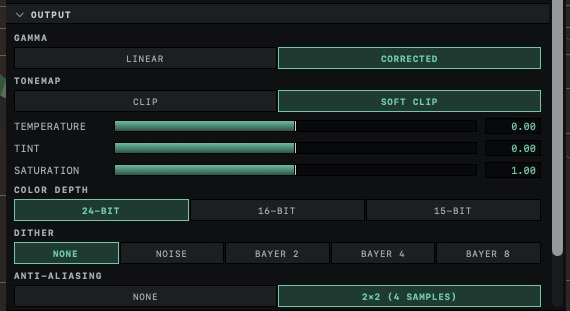
Click DONE and render again.
Object edges in the new render are smoothed.
A saved image also looks blocky when PIXEL SCALE in EXPORT RENDER is above ×1. Orbit then enlarges the image as it saves it, turning each pixel into a square block so that the pixels survive recompression when the image is uploaded. At ×1 the file keeps the size it was rendered at. Pixel scale is meant for pictures that a video or social media site will compress again, as Prepare renders for video and social media describes.
The render is slow
Orbit traces every pixel of a render on the Mac's processor, so the time grows with the size of the picture and with the number of rays each pixel needs. The line under a finished render in EXPORT RENDER ends with the time it took.
The render look sets most of the ray count. Smoothed edges cost four rays for every pixel instead of one. RADIOSITY '96 adds 8 rays from every point the camera sees, to gather light bounced off nearby surfaces, and 4 rays for each reflection off a rough surface. Those two counts are GATHER RAYS and GLOSSY RAYS in the SHADING section of RENDER SETTINGS, and lower numbers render faster. For test renders, a smaller size or a look without smoothing saves time.
Three other settings add rays. Under CHROME 2000, RADIOSITY '96 and the look Orbit starts with, each area light with SHADOWS checked sends about as many shadow rays as its SAMPLES setting in the INSPECTOR, 16 by default, for every point it lights. AMBIENT OCCLUSION, in the EFFECTS section, sends 8 to 64 rays per point, as set by QUALITY. A high REFL DEPTH keeps rays bouncing in scenes with many mirrors or much glass.
SIZE multiplies all of this, and 3840 × 2160 has four times the pixels of 1920 × 1080. PIXEL SCALE adds nothing to the render time, since it enlarges the picture when you save it. In the PERFORMANCE section, THREADS starts at the number of processor cores in the Mac, and a lower number leaves some of them unused.
With a very large number of triangles, the render waits at BUILDING SCENE… while Orbit prepares the geometry, before the first tile appears. EXPORT RENDER warns about the wait under RENDER SETTINGS, where the GEOMETRY row shows how many triangles the render traces.
Glass renders solid
Check the material first. Select the object and press M to open the MATERIAL BROWSER, where a material lets light through only when its TRANSPARENCY is above 0. In the GLASS group, Glass, Dark Glass, Frosted and Tinted Blue let light through. Crystal reflects the scene and glows along its edges, and nothing behind it shows through.
If the material is transparent, check REFL DEPTH, in the SHADING section of RENDER SETTINGS. It limits how many surfaces a ray from the camera may pass through or bounce off. A glass ball puts two surfaces between the camera and whatever is behind it, its front and its back, so it needs a REFL DEPTH of 2. RAY '95, TERRA '96, GLIDE '99 and RADIOSITY '96 set it to 1. The ray then passes through the front and stops at the back, which renders as a solid surface. CHROME 2000 and the look Orbit starts with set it to 2.
Raise REFL DEPTH to 2, and by 2 more for each further glass object a ray has to cross, up to 8. PRESET then reads CUSTOM, and scenes with many mirrors and much glass take longer to render. At 0, nothing in a render reflects or lets light through except water, which still mirrors the sky.
The viewport shows a transparent object as transparent at any REFL DEPTH, so glass can look right there and still render solid.
Glass in Orbit does not bend the light that passes through it, so it neither magnifies nor distorts what is behind it, though a rough glass such as Frosted blurs it when GLOSSY RAYS is above 1. Only water bends light.
Textures and patterns disappear under GLIDE '99
GLIDE '99 sets SURFACE to GOURAUD, which lights each triangle at its three corners and blends the color across it, starting from the plain COLOR of each material, in the viewport and in renders. Image textures drop out, and so do the NOISE, CELLULAR and PLANET patterns under COLOR SOURCE and any bump set under BUMP SOURCE.
Colors that Orbit works out at the corners stay. The height colors of elevation zoning remain, on a terrain or any other object, and so do the wood and leaf colors that GROWTH ZONING gives a plant. Reflections, transparency, fog, a patterned ground plane and the ripples on water are unaffected.
To keep the rest of the look and get textures back, open RENDER SETTINGS and click SMOOTH under SURFACE, in the SHADING section. The other settings of GLIDE '99 are kept, and PRESET reads CUSTOM. Every other look shows textures.
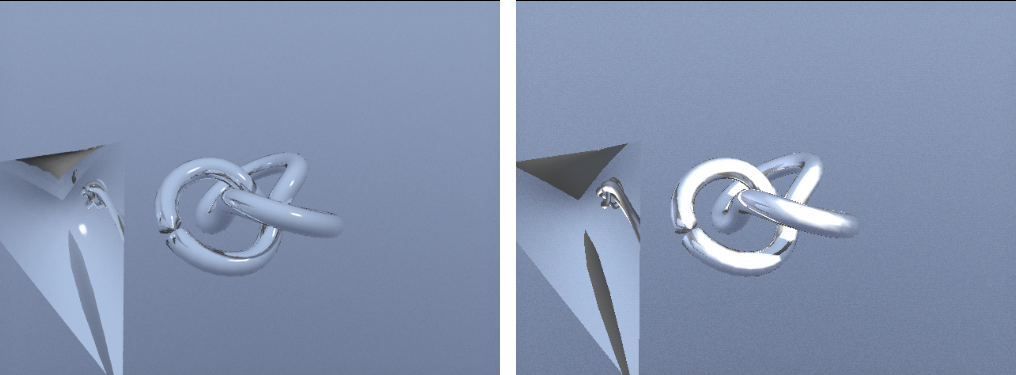
Image textures look blocky
Under RAY '95, a render reads each image texture without smoothing between its pixels, so an image seen up close shows its pixels as square blocks. The viewport and the other looks smooth them. RENDER SETTINGS has no separate control for this, so choose another look to smooth textures in renders.
Glow or lens flare does not appear
GLOW / BLOOM, in the EFFECTS section of RENDER SETTINGS, makes the parts of the picture that are brighter than THRESHOLD glow. With TONEMAP set to CLIP, as under RAY '95, TERRA '96, GLIDE '99 and the look Orbit starts with, no traced pixel is brighter than white, which counts as 1.0. A THRESHOLD of 1.0 or more then finds nothing to glow apart from lens flares and glowing motes. Lower THRESHOLD, or choose SOFT CLIP under TONEMAP in the OUTPUT section, which keeps highlights brighter than white until after the glow is added. With the glow's INTENSITY at 0 there is no glow at all.
In the same section, LENS FLARE draws flares for the sun, when VISIBLE SUN DISC is on in the ENVIRONMENT BROWSER, and for point and spot lights whose INTENSITY in the INSPECTOR is 1.5 or more. Area lights never flare. A flare fades as its light moves out of the frame and disappears while an object, the ground plane or water hides the light. Flares never appear in the flat top, front and side views.
The scene goes dark after clicking a card under BUILT-IN
A card under BUILT-IN in the ENVIRONMENT BROWSER replaces the whole environment, including the sun. None of these cards turns on SUN LIGHT, the setting that makes the sun light the scene, and all of them leave fog and the ground plane off. A scene lit only by the sun goes dark. Landscapes from the Scene Wizard are lit that way, because they include no lights.
Press ⌘Z to return to the environment you had. To keep the new sky instead, light the scene with its sun.
If the ENVIRONMENT BROWSER is closed, press
⌘Eor click the ENVIRONMENT card at the bottom right of the window.The browser shows the settings of the current environment on its right side.
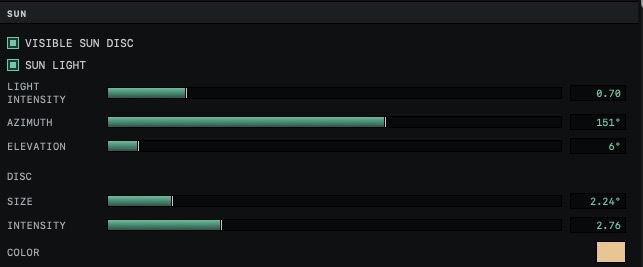
Under SUN, turn on SUN LIGHT.
The sun lights the scene again, from the direction set by AZIMUTH and ELEVATION.
When the sky itself turns black and stays black whatever sky settings you change, the card was Void. Under Void the sky is black in the viewport and in renders, and reflective objects show black where they would reflect the sky. Choose another card, such as Classic, the sky a new scene starts with.
A scene opens with a different look
A scene opens in the look Orbit is set to at the time, not necessarily the one it was made with, because the render look is one of the render settings that scene files do not store. Click the RENDER card and choose the look again.
Opening a scene also returns the viewport to the Shaded view, whichever view you used when you saved it.
An image texture larger than 1,024 pixels can look softer once the scene is reopened. The scene file carries a copy of each image, no larger than 1,024 pixels on its longer side, and Orbit uses that copy. Choosing the original image again in the MATERIAL BROWSER restores its full detail until the scene is saved and reopened.
The finished picture is gone
BACK TO SETTINGS discards the finished picture, and so does closing the EXPORT RENDER sheet. A discarded picture cannot be retrieved, so render it again and click SAVE IMAGE before anything else. SAVE IMAGE saves in the format chosen before the render. For another format, click BACK TO SETTINGS, change FORMAT and render again.
The saved image carries marks
Made with Orbit 3D in the bottom right corner and Get Orbit 3D at www.orbit-3d.com across the center are the marks of the free version. Orbit adds them to the images, turntables and loops you export while it runs as the free version, including exports started while the status chip in the toolbar still reads CHECKING, before the App Store has confirmed a purchase. The free and full versions explains the marks, and Renders still carry the watermark after buying covers a purchase that does not seem to take effect.
Related: The viewport, the preview and the render, Choose a render look, Render and save an image and Render settings.