Add water and choose its waves
Water in Orbit is a flat sheet that reaches to the horizon. You set its height and pick its waves from the WAVE GALLERY, and its material decides the color and how clear it is.
Add water
Click ADD OBJECT in the toolbar and choose WATER.
A flat plane of water covers the ground in every direction and is selected. The INSPECTOR shows the sections WATER, RIPPLES and EDITOR.
Scroll the INSPECTOR to TRANSFORM and drag HEIGHT.
The water rises or falls. HEIGHT runs from −100 to 100 meters. Raise it until it floods the low parts of a terrain.
The water has no edges and no thickness, so its height is its only position. TRANSFORM shows HEIGHT and no other fields, since moving the plane sideways, turning it or scaling it would change nothing.
A left-click anywhere on the water selects it. A right-click on the water opens the same menu as a right-click on empty ground, with its ADD items, because otherwise a scene covered in water would leave nowhere to add objects. Clicking its row in OBJECTS also selects it.
Pick a wave style
With the water selected, scroll the INSPECTOR to EDITOR and click EDIT WATER….
The WAVE GALLERY opens, with 15 wave styles in a grid.
Click a style, such as CHOPPY SEA.
The waves on the water change at once. The footer reads Click a preset to apply. Undo to revert.
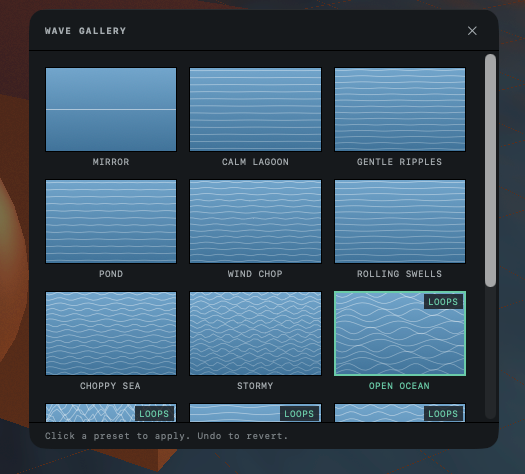
Try other styles, then click the X at the top of the gallery or press Escape.
The gallery closes and the water keeps the last style you clicked.
⌘Z returns to the waves you had before the last click. The pictures in the grid are drawings of each wave pattern, not renders. A style is outlined in the grid only while the wave settings of the water match it. A style changes only the waves. The color of the water, its clarity, IOR, ABSORB R, ABSORB G, ABSORB B, FOAM RADIUS and FOLLOW WIND stay as they were. Orbit cannot save wave settings as a new style.
MIRROR turns the waves off and leaves the surface still and flat, so it reflects the sky without ripples.
Waves that loop
Seven styles carry the LOOPS badge: OPEN OCEAN, NORTH SEA, GLASS SWELL, HARBOR, TRADE WINDS, GROUND SWELL and SQUALL. They use SPECTRAL waves, which keep moving during a Loop Studio animation and are back where they started each time the loop repeats, so the join does not show. The other styles use CLASSIC ripples, which drift away during an animation and can leave a visible jump at the join. See Make a loop without a jump.
CLASSIC and SPECTRAL
The choice at the top of RIPPLES sets how the waves are made, and the sliders below it change with it.
| Setting | How the waves are made | Sliders of its own |
|---|---|---|
| CLASSIC | Random ripples in layers. They drift at WAVE SPEED while a Loop Studio animation plays. | SCALE for the size of the ripples, OCTAVES for finer layers, ANISOTROPY to stretch them into long crests, WAVE SPEED |
| SPECTRAL | A sea of 24 waves of different lengths, in which long swells travel faster than short chop | WIND SPEED for larger swells, SPREAD for waves that run in parallel lines at high values and cross each other at low ones, SEED for another arrangement of the same sea |
STRENGTH sets how rough the surface looks in both. WIND DIR sets the direction the waves travel. With BUMP ENABLED off, the surface is still and flat and the sliders below it are dimmed.
The waves change the way the surface catches light and reflects the sky. The plane itself stays flat, so its outline against the sky never changes. CLASSIC ripples also fade to a smooth surface between about 10 and 60 meters from the camera, and that distance cannot be changed. SPECTRAL waves lose their short chop with distance and keep their long swells.
Let the wind set the direction
In RIPPLES, click FOLLOW WIND. The waves then travel in the direction of the wind of the scene, and WIND DIR is dimmed. Only the direction of the wind is used; its strength does not make the waves rougher. Set the wind itself as in Make things move in the wind.
Color and clarity
A new water plane wears the Water material. The WATER heading of the MATERIAL BROWSER holds five others: Ice, Mercury Pool, Lava, Acid Pool and Murky Swamp. Press M to open the browser, and click a card while the water is selected.
A material card replaces the whole material of the water, and the ripple settings are part of it, so the waves change too and FOLLOW WIND turns off. Choose the material first and the wave style after it. For changing materials in general, turn to Apply and edit materials.
Refraction, depth color and foam
The sliders in the WATER section act only in the render and in the LIVE preview. In the viewport the water reflects only the sky, and objects under the surface do not show through it.
IOR sets how strongly the water bends the view of objects under its surface, from 1.0, no bending, to 2.5. It starts at 1.33, the value for real water. No other object in Orbit bends what is seen through it; glass lets the view pass straight through.
ABSORB R, ABSORB G and ABSORB B set how quickly red, green and blue light fade as the water gets deeper. The Water material fades red fastest, so deep water turns blue. FOAM RADIUS sets the width of a white ring of foam where an object sits a little below the surface, and 0 turns the foam off.
With TRANSPARENCY of the material at 0, the render skips refraction. The whole WATER section is then dimmed, with the hint Refraction is off at TRANSPARENCY 0. Raise it to use these.
What water cannot do
Water cannot take part in a boolean. A boolean needs a closed solid with an inside and an outside, and the water is a single surface without edges, so BOOLEAN is dimmed. With the water and another object selected, holding the pointer over it shows the name of the water followed by the reason, Water is an infinite plane, not a closed solid. For the same reason water takes no deformers and no array, and it cannot be turned into an editable mesh. The other conditions are in Combine and cut objects with booleans.
Every water setting is listed in Object types.